Multiprocessor Systems: Dual Celerons
by Anand Lal Shimpi on March 18, 1999 9:23 PM EST- Posted in
- CPUs
What You Need
- 2 Socket-370 Celeron processors of the same clock speed, preferably of identical steppings/revisions.
- 2 Socket-370 to Slot-1 adapter cards, AnandTech used the Microstar MS-6905 cards provided by Azzo Computers. Some adapter cards will differ in the modification process, so you may have to consult the technical documentation on your specific parts if using anything other than the MS-6905.
- Tape or Soldering Iron
- Scissors, preferably an exacto knife or anything able to make small cuts out of the tape for hard to reach areas
- Wire, the smaller the better, ideally you'll want to have insulated wire although it is easier to setup with bare wire
- Anti-static wrist strap (optional)
The Procedure
Although this is a step-by-step procedure, it is recommended that you read through the entire procedure before beginning.
Step 1)
First things first, be sure to either put on your anti-static wrist strap, or ground yourself by touching a part of your computer's case. After doing so, unpack the first Socket-370 to Slot-1 adapter card and turn it face down so that the Socket-370 CPU socket is facing the ground and the back side of the card is facing you.
Step 2)
Test both of the cards individually, making sure they work properly with your Socket-370 processors. Also test both cards/processors out at any overclocked speeds you are hoping to run them at. After the testing, remove the cards from your motherboard and be sure to ground yourself once again if you're not using an anti-static wrist strap.
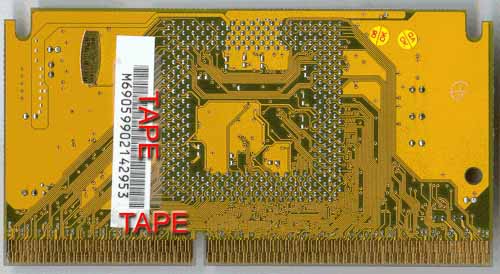
Step 3)
If you're going to be soldering all connections then you can skip this step. Place two strips of tape on the PCB. Place one along the left edge of the back of the Socket-370 CPU socket and place the other above the Slot-1 contacts as shown in the following diagrams:


0 Comments
View All Comments