Original Link: https://www.anandtech.com/show/1554
Photosmart M307: HP's Newest is Put to the Test
by Stephen Caston on November 27, 2004 12:05 AM EST- Posted in
- Digital Camera
Index
The Photosmart M307 is one of two entry-level digicams that were recently released by HP. The M307 offers a 3.2 megapixel output and 3x optical zoom. Its 4.1 megapixel brother is very similar with a slightly larger sensor. The M307 offers all the functionality that you would expect from reasonably priced point-and-shoot digicam, including an Auto shooting mode, several preset modes, and a video recording option that captures both video and audio.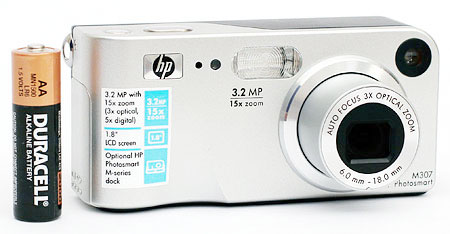
As HP continues to develop their cameras to compete in the digicam market, we were interested to see how their cameras compare to big-name camera companies like Nikon, Canon, Olympus, etc. In our review, we discovered that although their entry-level cameras are priced right, HP may still have some work ahead of them. The M307 proved to be rather slow in terms of startup, shutter lag, and write times. In addition, we found its images to be very noisy even at the lowest ISO setting. The camera proved to have a decent resolution performance, but moiré and stuck pixels are visible throughout its images. Read more to find out all the details.
Product Sample provided by Newegg.com.
HP Photosmart M307 Specifications
| HP Photosmart M307 | |
| Release Date | August 2004 |
| Price | ~$165 |
| Pixel Count | 3.2 Million |
| Camera Type | Compact |
| Highest Resolution | 2048x1536 |
| Lower Resolutions | 1280x960, 640x480 |
| Sensor Type | CCD |
| Sensor Size | 1/2.7" |
| LCD Screen Size | 1.8" |
| Optical Zoom | 3x; 40 - 111mm equivalent |
| Focus Range | 20" - Infinity |
| Macro | 4 - 32" |
| Digital Zoom | 5x |
| Lens Thread | None |
| Auto Focus | Yes |
| Auto Focus Type | TTL |
| Manual Focus | No |
| Aperture Range | W: f2.9 - 4.9; T: f4.9 - 8.0 |
| Shutter Speeds | 2 - 1/2000th sec. |
| ISO | Auto, 100, 200, 400 |
| Flash | Built-in |
| Flash Range | W: 9.2'; T: 5.5' (ISO 100) |
| Flash Compensation | None |
| Exposure Compensation | +/- 2 stops in 1/2 increments |
| White Balance | Auto, Sun, Shade, Tungsten, Fluorescent |
| Bracketing | None |
| Metering | Center-weighted |
| Color Filter | RGB |
| Aperture Priority | No |
| Shutter Speed Priority | No |
| Manual Exposure | No |
| Continuous Drive | Yes, 2.0 fps for 4 frames (2048x1536) |
| Self-Timer | Yes, 10 sec. |
| Storage Method | SD/MMC, Internal |
| Storage Included | 16MB Internal |
| Compressed Format | JPG |
| Uncompressed Format | None |
| Quality Settings | Best or Default (only for 2048x1536) |
| Video clips | 320x240, 30 fps, w/sound, MPEG1, unlimited duration |
| Battery Type | 2 AA Ni-MH/Alkaline |
| Charger Included | No |
| PC Interface | USB |
| TV-out | Yes, only with M-series Dock |
| Tripod Mount | Yes, plastic |
| Weight (w/out battery or card) | 5.15 oz. |
| Dimensions | 107 x 53 x 36mm |
| Included in the Box |
|
The Design: HP Photosmart M307

Click to enlarge.
The front of the M307 features a 3x optical zoom providing a fairly standard zoom coverage of 40mm - 111mm. On the wide end, this camera is just a bit less wide than average. To the upper-right of the lens is the viewfinder window. At the upper-left is the built-in flash and just to the left are the self-timer lamp and the microphone. The front of the camera has a lot of extra space on the left side for use as a handgrip. The left side even has a "dip" in the body for easier handling.

Click to enlarge.
On the back of the camera is the 1.8" LCD monitor with 130,000 pixel display. Just to the left is a column of 4 buttons: Flash, Mode, Timer/Burst, and HP Instant Share/Print. Above these buttons are the viewfinder and two indicator lamps. The top indicates video recording and the bottom indicates auto-focus status. To the right are the "Live View" and "Playback" buttons. These toggle between record and play modes. To the right is the main power switch with a power indicator lamp next to it. On the right side of the LCD is a 4-way controller pad with a separate Menu/OK button in the middle. Just to the upper-right is the activity light that blinks while a file is being written to the flash card. To the upper left of the activity light is an indention fitted for your thumb where the zoom controller is located. The zoom controller serves both to operate the optical/digital zoom in "Live View" mode and to zoom in/out on images in Playback mode.

Click to enlarge.
On the top of the camera are the shutter button and the video button. This concept of two "shutter" buttons can be seen on some other previous HP models such as the R707 and 935.

Click to enlarge.
The bottom of the M307 features a connector for use with the optional HP Photosmart M-series dock. The optional dock can serve to transfer images to your PC or printer, view images on a TV, or charge Ni-MH batteries that come with it. The dock sells for about $50. Also on the bottom of the camera is a plastic tripod mount.
 Click to enlarge. |
 Click to enlarge. |
On the right side of the M307 is a sliding hinged door that reveals the SD/MMC memory card slot and the battery compartment. Although the camera is bundled with 2 AA alkaline batteries, NiMH batteries are recommended. There is also a post for the included wrist strap.
 Click to enlarge. |
 Click to enlarge. |
The left side of the camera features the 3.3V DC-in port and USB port. A rubber tab fits into these openings while they are not in use.
Overall, the M307 feels pretty comfortable in our hands. However, its boxy build makes it rather difficult to pocket. The body is fairly durable and constructed of hard plastic with a metallic finish on the front. It is unfortunate that the camera does not have a built-in speaker for reviewing video clips and voice memos. Now, we'll move on to recording capabilities.
Recording Features
In all recording modes, the M307 records images as JPG files. Only the highest resolution setting offers an option for quality (Best, Normal). Below is the full list of resolution/quality options:| Resolution (pixels) | Quality |
| 2048x1536 | Best, Normal |
| 1280x960 | N/A |
| 640x480 | N/A |
The M307 offers 7 still recording modes in addition to a video recording option. The 7 still modes are Auto, Macro, Fast Shot, Action, Portrait, Landscape, and Beach & Snow. Auto mode is a general purpose shooting mode where the camera decides all of the shooting settings for you. In Macro mode, you can focus on objects as close as 4 inches from the lens. Fast Shot mode fixes the camera's focus at infinity so that you can take pictures without the delay of focusing. In Action mode, the camera uses a fast shutter speed automatically and high ISO setting to capture fast moving subjects. With Portrait mode, the camera will use a large aperture to blur the background while keeping your subject in focus. Landscape mode uses the opposite (i.e. a small aperture) to keep the foreground and background in focus. In Beach & Snow mode, the camera attempts to avoid underexposing bright scenes by compensating the exposure automatically. In Auto, Macro, and Beach & Snow modes, you have access to all the Capture Menu options. In the other modes, the option to adjust the ISO setting is unavailable. The LCD can be toggled on or off by pressing the "Live View" button. Below is a typical display in record mode.
Typical display - Auto mode
By pressing the Timer/Burst button, the M307 can be set to record in one of the following drive modes: Normal, Self-timer, Self-timer 2 Shots, and Burst. With Self-timer mode, the camera will wait 10 seconds before taking the picture. The option "Self-timer 2 Shots" simply takes an additional picture a few seconds after the first. In Burst drive mode, the camera can take up to 4 pictures as long as the shutter button is held down. The LCD display is disabled during shooting. If the shutter button is held down past 4 images, the camera will continue to take pictures at a slower rate until the memory card is full.
In Auto recording mode, the flash mode is set to Auto Flash by default. However, by pressing the Flash button you can cycle through the following additional flash options: Red-eye, Flash On, Flash Off, and Night. The option "Flash On" forces the camera to use the flash even if the camera's exposure system deems it unnecessary. By using this option, you can use the flash to fill in shadows on subjects created by harsh lighting situations (such as backlighting). With the Night option, the camera uses red-eye reduction and a slow-sync flash to capture the shot. Slow-sync is when the camera fires a flash and then continues to expose the scene to allow ambient light to fill in the background. Use of a tripod is highly recommended for night pictures due to the extended exposure. In Fast Shot mode, the flash is disabled and there are no options to enable it. In all other recording modes, all five flash options are available.
 Focus locked |
 Focus failed |
When the shutter button is half-pressed, the camera will attempt to focus on the object located between the auto-focus brackets seen on the LCD monitor. If focusing is successful, the AF brackets turn green and the AF indicator lamp lights to indicate that focus has been achieved. If focus cannot be achieved, the AF indicator lamp will blink and the brackets will turn red. Even if focus is not achieved, the camera will still allow you to take a picture by pressing the shutter button down fully. In Macro mode, focus works in a similar way except that the camera will not permit you to take a picture that is not focused.
To perform an optical zoom, you can hold down the telephoto end of the zoom controller. At the limit of the 3x zoom, the lens will stop moving. At this point, to perform a digital zoom, you must release the zoom controller and press it again. Since the digital zoom essentially crops the image for you, the new image resolution will be displayed on the LCD monitor as you zoom digitally (e.g. "1.4MP").
In all recoding modes, there are some common options available in the Capture Menu. This menu can be accessed by pressing the Menu/Ok button in any recording mode. Exposure Compensation can be set to +/- 2 stops in 1/2 stop increments. The image quality options that we discussed at the top of the page are also available in the menu. White Balance can be set to Auto, Sun, Shade, Tungsten, or Fluorescent. There are 3 different color options: Full Color, B&W, and Sepia. Also, there is an option to imprint either the Date or Date & Time in the lower-left corner of each picture. As we mentioned earlier, shooting modes Auto, Macro, and Beach & Snow have an option for ISO adjustment. The available settings are Auto, 100, 200, and 400.
The M307 offers the option of recording an audio clip along with pictures. The audio clip can be recorded at the time that the picture is taken or later in playback mode. To record a clip when taking a picture, simply continue to hold down the shutter button after taking a picture. There is no limit to the length of the clip other than the available remaining space on your flash card/internal memory. The audio clip is embedded in the JPEG file, making it difficult or impossible to play back without using the bundled software. We should also point out that the camera does not have a built-in speaker, so you can't even listen to the audio on the camera without using the optional dock. Most other cameras simply save audio clips as separate files, making them easier to deal with. You can press the HP Instant Share button at any time to get to the Instant Share menu. Here, you can tag images for printing or emailing later.
Movie Mode
Movie mode on the M307 is pretty basic. To start recording a video clip, simply press the "Video" button next to the shutter button. The camera sets the focus automatically to infinity. Video clips are recorded as MPEG1 files at 30fps and 320x240 with sound. Both optical and digital zooming are disabled during recording. The camera allows you to select white balance and color settings for the video. Also, the video clips are only limited by the available space remaining.This camera has an extensive help system built into the camera. Every setting in the menu includes a help option. By selecting a "help" option, you are presented with at least one paragraph describing the purpose of the relevant menu item. Additionally, the M307 has an entire Help section in the menu with 14 help topics from "Top Ten Tips" to "Using Shooting Modes" to "Camera Shortcuts". This level of on-camera assistance goes far beyond what we've seen on other cameras and we think some people may find it useful.
The Setup menu offers some options to adjust basic camera operation. Below is a table outlining these options:
| Setup menu | |
| Display Brightness | Low, Medium, High |
| Camera Sounds | Off, On |
| Live View Setup | Off, On |
| Date & Time | Set |
| USB | Digital Camera, Disk Drive |
| TV Configuration | NTSC, PAL |
| Language | Select |
| Move Images to Card | Cancel, Yes |
Most of these are pretty straightforward. The "Live View Setup" option refers to whether or not the camera should start up with the LCD monitor on or off by default. The option "Move Images to Card" will move any images that are stored on the internal memory to a flash card.
Overall, the Photosmart M307 offers all the basic recording features that you would expect from an entry-level point-and-shoot camera. You have a fully automatic recording mode and a handful of preset options as well. The video mode doesn't look too promising, but we aren't expecting much from a camera in this price range. We should point out that we are disappointed that audio clips are embedded in JPEG files. This really limits the possibilities of what you can do with the audio later on. However, in general, we think that the M307 offers a good set of recording options and we are pleased to see that a half-press of the shutter button will automatically exit any menu currently open to get the camera ready to shoot.
Playback Features
Playback mode can be entered in one of two ways: by pressing the Playback button while in a record mode or by holding down the Playback button while turning on the power. The latter method allows you to view images by powering on the camera without extending the lens. Either way, you will be presented immediately with the most recent image/video taken. The camera first loads a low-res version of the file. After about 2 seconds, a high quality version is displayed. To move between pictures, you must press the left/right arrow buttons.  Thumbnail view |
 Image regular view |
 Image magnified |
By pressing the "Zoom Out" button, you can view 9 images at a time in a 3x3 array. Conversely, you can magnify an image by pressing the "Zoom In" button. In the sample above, we have zoomed in as far as the camera would allow us. At about the halfway zoom point, the image starts to become noticeably pixelated (as the image above demonstrates). While zoomed in, you can move around to different areas of an image by pressing the arrow buttons. We found zooming in/out and moving across images to be fairly quick and smooth. To delete an image, you should press the Menu/OK button. After selecting Delete from the menu, the camera offers 4 additional options: Cancel, This Image, All Images on Card, or Format Card. If you do not have a flash card installed, the word "Card" will be replaced with "Memory" in those options. We should also point out that an image/video can be deleted immediately after being taken as well. Right after an image/video is taken, the LCD will display the frame and the text "Press OK to Delete". Then the choices are "Cancel" or "Delete". In Playback mode, pressing the Menu/OK button also offers the options "Record Audio" and "Rotate".
The great thing about the M307 is that there is no operational distinction between Playback and Record modes. The Menu options are the same in both and you can switch back to Record mode with a half-press of the shutter at all times (assuming the lens is extended). This means that the camera is always ready to shoot.
Battery Performance
Our general method for battery testing is to reset the camera to its default settings and change the recording mode to the highest quality option. Then, we take 5 pictures without the flash and 2 pictures with the flash until the battery is dead. For more information on our battery test, please refer to our Testing Procedures page. For this test, we used 2-AA NiMH Power2000 2500mAh batteries charged overnight in a Power2000 wall charger. The batteries were fully drained before charging for the test.| Number of shots taken in one battery charge |
| 753 |
During our test, we encountered a strange problem. About 250 shots into the test, the lens and auto-focus system simply refused to work. We couldn't even power the camera down. Thinking that perhaps it was an overheating issue, we removed the batteries and waited approximately 30 minutes before trying again. From this point on, the camera functioned normally. We're not sure exactly what caused the problem as we couldn't replicate the error. Perhaps it was an overheating issue, in which case, you may only encounter it during long continuous shooting sessions. However, it may just have been our particular camera. At any rate, we thought it was important to mention. At 753 shots in a single charge, the M307 provides a fairly impressive battery performance. Also, the benefit of AA powered cameras is that you can buy extra batteries very cheap to have available as backup.
The Timing Tests
* NOTE: For all of our time tests, the camera is reset to its factory default settings and set to record using the highest resolution and quality setting. It is set to record in Auto mode. A PNY 512MB SD card was used.Before reading our results, please refer to our Testing Procedures page.
Startup Time
The startup time is recorded from the moment that the power button is pushed to the moment that the shutter sounds. The camera is set to record in Auto mode.| Startup time (seconds) |
| 5.89 |
The M307 isn't going to set any records for startup speed at 5.89 seconds. In fact, this is the second slowest startup time that we have seen so far, starting up just faster than the Kodak DX4530 at 6.02 seconds and a bit slower than the Olympus C-50 Zoom at 5.70 seconds.
Shutter Lag
To record shutter lag, we perform two tests. For the first test, we pre-focus the lens and measure the amount of time that it takes the camera to take a picture after the shutter button is pressed. The second test measures the time that it takes for the camera to take a picture after we press the shutter button without pre-focusing. Each test is performed 3 times and the results are averaged. For more information regarding our testing procedures, please refer to our Testing Procedures page.| With Pre-focus (seconds) | Without Pre-focus (seconds) |
| 0.09 | 0.93 |
For pre-focus shutter lag, the M307 puts in a good performance at 0.09 sec. However, without pre-focusing, the camera takes a lengthy 0.93 sec. to take a picture. At nearly a full second for general shutter lag, you will most likely want to pre-focus whenever possible.
Write Times
We recorded 5 different write times with a PNY 512 SD card:Single Shot - The time that it takes for a single picture to be written completely to the flash card (the time that the "activity light" is on).
Shot To Shot (STS) - The time until the second shot is able to be taken after the first (shutter to shutter).
Shot To Shot w/Flash - The time that it takes for the camera to take two pictures with the flash, starting from the moment that the first flash is fired to the moment that the second is fired.
Shot To Shot w/Buffer Full - The time between taking the last shot that fills the buffer to the moment that the shutter sounds again.
Clear Buffer - The time that it takes the camera to clear the buffer after a full burst of pictures is taken.
We performed each test three times and averaged the results. Below are the resolution, quality setting, and average file size used for the tests.
2048x1536, Best, Avg. file size = 1.7 MB
| Single Shot | Shot To Shot | Shot to Shot w/Flash | Shot to Shot w/Buffer Full | Clear Buffer |
| 6.02 | 3.02 | 5.65 | 8.12 | 23.00 |
It's always a bad sign to see a camera take a long time to write a single image. With the M307, it takes 6.02 seconds to do just that. On the bright side, the camera has a 4-shot buffer, so you don't have to wait 6 seconds for each shot. However, a 3.02 second Shot to Shot time is not very impressive. With the flash enabled, the time slows to 5.65 seconds between shots, which is on the slow side of average. After the buffer fills with 4 shots, shooting slows to 8.12 seconds between shots. In Burst mode, the M307 is able to shoot 4 frames at 2.04 fps. This is a relatively impressive speed for an entry-level camera. Unfortunately, there is a hefty price to pay for this shooting speed. Clearing the buffer of all 4 shots takes 23 seconds. Keep in mind, though, that you only have to wait 8.12 seconds to shoot another shot. In short, the M307 leaves much to be desired with its performance speed.
Resolving Fine Lines
For our resolution test, we reset the camera to its default settings and then used the highest resolution and quality setting with Tungsten WB. The camera was then set to +0.5 E.V. For more information, refer to our Testing Procedures page. The color space is sRGB. Below are 200% crops of the test. Click on a crop to see the full chart.
Click to enlarge.
Click to enlarge.
In both the horizontal and vertical crops above, the M307 just barely makes it to 1,100 LPH before becoming ridden with artifacts. Although this is a fairly good resolution performance for a 3 megapixel camera, we are disappointed to see moiré just past the resolution limit. We also spotted some hot pixels throughout the chart.
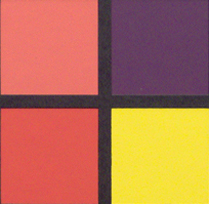
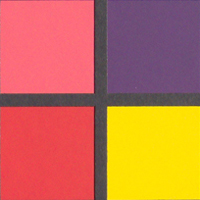
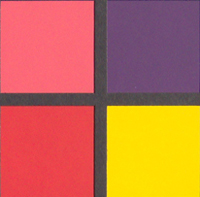
Color Reproduction
* For all of our color tests, we reset the M307 to its factory default settings. It was then set to record using the highest image quality option.We took a picture of our color chart using the Auto and Tungsten WB settings. Click on a thumbnail below to view the full-size image.
Tungsten WB
| Auto WB | Tungsten WB | |
 Click to enlarge. |
 Click to enlarge. |
|
 Reference Chart ("actual colors") |
||
| Auto WB | Tungsten WB |
 |
 |
Surprisingly, both the Auto and the Tungsten setting are both very accurate. The Auto setting produces colors with moderate saturation while the Tungsten setting produces colors with a higher saturation. We are also pleased to see that both charts are fairly well-exposed.
Daylight WB
| Auto WB | Daylight WB | |
 Click to enlarge. |
 Click to enlarge. |
|
| Reference Chart ("actual colors") |
||
| Auto WB | Daylight WB |
 |
 |
With both Auto and Sun WB settings, the color charts are very accurate and bright. Overall, the M307 does a great job reproducing accurate colors in our chart. It is refreshing to see a camera that can produce accurate colors with Auto WB in Tungsten light.
Built-in Flash
For the flash test, we set the camera to Auto mode w/Auto flash. The picture was taken from 5 feet away.
Click to enlarge.
As demonstrated in the picture above, the M307 produces a slight bluish cast with the built-in flash. This is a fairly common problem and does not appear to be worse than average.
Noise
The noise test consists of pictures of our studio shot taken at increasing ISO levels to show the effect on the image. The pictures were taken after resetting the camera to its factory default settings. The camera was then set to record with the highest quality option with Tungsten WB. Click on a 100% crop below to view the full-size image. All images are sRGB color space.| ISO 100 |  Click to enlarge. |
| ISO 200 |  Click to enlarge. |
| ISO 400 |  Click to enlarge. |
As these crops demonstrate, there isn't really a dramatic difference in the increase of noise from ISO 100 to 200. Even at ISO 100, there is a considerable amount of noise visible. As the ISO setting is raised, notice that some color information gets lost in the noise. Also, the ISO 200 image is a bit underexposed compared to ISO 100. Other than that, the addition of noise isn't too bad. From ISO 200 to 400, however, there is a significant loss of detail. At ISO 400, the image would probably still be considered usable, though it is quite fuzzy in appearance.
General Image Quality
For these pictures, the camera was reset to its factory default setting. Then, it was set to its highest quality recording setting. The pictures were then taken in Auto mode unless stated otherwise. Portrait-style images have been rotated using Irfanview's "lossless operations". Click on a thumbnail to view the full-size image. The crops below the thumbnails are 100%. All images are in sRGB color space.  ISO 100, 1/1100, f/4.8 Click to enlarge. |
 ISO 100, 1/500, f/4.8 Click to enlarge. |
 ISO 100, 1/1250, f/4.8 Click to enlarge. |
 |
 |
 |
 ISO 100, 1/310, f/4.9 Click to enlarge. |
 ISO 100, 1/160, f/7.8 Click to enlarge. |
 ISO 100, 1/400, f/4.8 (Macro) Click to enlarge. |
 |
 |
 |
In the first 4 samples above, we have highlighted what we think are some important image quality problems. Firstly, in several images, we spotted "jaggies" along diagonal lines. These "jaggies" are a result of the M307's over-sharpening process. In the second sample, we cropped out a portion of the image that displays moiré, which is a more common problem with "lower" resolution cameras. In the third sample, we wanted to point out something that we feel is the most significant weak point of the M307 - loss of detail. In many of the images taken with this camera, in the place of detail, we noticed this fuzzy, muddy appearance. This image also displays the rather small dynamic range of the camera. In the fourth sample, we are looking at more detail loss, but this time, it is concentrated in shadow areas. Objects with plenty of light retain a moderate amount of detail. However, there is a dramatic loss of detail for objects in the shade.
Things look a lot better in samples 5 and 6. In both pictures, the image quality looks pretty decent overall. In the last shot, the M307 proves it can take sharp macro pictures. In the end though, we aren't very impressed with the M307's image quality. The biggest problems are over-sharpening, moiré, loss of detail in shadows, and high noise. We were especially surprised to see so much noise at the lowest ISO setting.
Low Light

ISO 100, 2 sec, f/4.7
Click to enlarge.

In this two-second exposure, the image is still quite noisy for ISO 100. Unfortunately, the camera limits the shutter speed to a maximum of two seconds so there is no possibility of performing longer exposures. Also, throughout the image, we spotted several stuck pixels.
Movie Mode
(320x240, 30 fps)
Click to view.
As the sample above demonstrates, although 30 fps is great to have, a video clip at 320x240 is hard to get excited about. In addition to the video's noisy appearance, we were also disappointed with the audio quality. There is a constant hissing sound that can be heard during playback. Although we weren't expecting much from the video mode on this camera, the unbearable audio and low resolution renders its functionality nearly useless.
Final Words
As far as HP's entry-level digicams go, we are still waiting to be impressed. In our review of the Photosmart M307, we found a lot of problems. For starters, the camera proved to be very slow in almost every respect. It takes nearly 6 seconds to take a picture after turning on the camera. The camera also showed nearly a second of shutter lag when we took a picture without pre-focusing. Write speed didn't prove to be the camera's strong point either. The Shot to Shot time is about 3 seconds for the first 4 shots. After this, you can expect to wait a little over 8 seconds between shots. Also, although we were impressed with the burst ability at 2.0 fps for 4 frames, it takes a painful 23 seconds to clear these pictures.Sometimes a camera's speed can be overlooked if the image quality is superior. This is not the case with the M307. We found images to be pretty noisy, even at ISO 100. In addition, shadow detail is almost non-existent as the camera seems to have a relatively small dynamic range. We also noticed moiré in a number of images that we took. That being said, the actual resolution performance is pretty decent despite the stuck pixels that appeared throughout the resolution chart and other samples. When it comes to video capability, we weren't expecting a lot and it's a good thing that we weren't. The best thing about the video mode is that it shoots at 30 fps. Otherwise, the resolution is small at 320x240, the image is noisy, and the audio quality is horrible.
Through all these negative findings, there is a bright side. Firstly, the Photosmart M307 is priced very reasonably at ~$165. Since point-and-shoot users are unlikely to be printing out 8x10 enlargements, they will probably find the image quality not too bad. In fact, the noise and moiré problems may not even be noticeable after resizing for screen viewing or printing at 4x6. Also, we were impressed with the camera's color reproduction. Even with Auto WB in tungsten light, the colors were very accurate. In addition, other than our temporary shooting problem, the M307 proved to have a respectable battery life. Considering the low price of the Photosmart M307, it is not altogether a bad deal. We just hope that they can do better in the future.
| Pros | Cons |
|
|
Thanks again to Newegg.com for loaning us the HP Photosmart M307 for review.


