Testing Procedures
The Battery Test
Our battery test is designed to report an ideal number of shots that a battery cycle will allow. The method is as follows:- Fully drain the camera's batteries (by shooting until dead)
- Recharge the battery to full capacity
- Reset the camera to factory default settings
- Set the camera to largest recording mode available (RAW if possible)
- Load the camera with a memory card
- Turn on LCD preview monitor (if available)
- Take 5 pictures without the flash
- Take 2 pictures with the flash
- Repeat process until memory card is full
- Turn off camera
- Turn on camera
- Delete all pictures with in-camera function (use in-camera format option every other time if available)
- Begin taking pictures where we left off until we can't take any more (i.e.we continue to take pictures without the flash, if the camera allows us, until the battery is fully dead)
Timing Tests
Our timing tests help to see how a camera performs from a technical standpoint. It is one of the ways that we are able to compare the performance of cameras in a strictly technical manner. We have three tests that we run on every camera: shutter lag, startup time, and disk write time. For all of our timing tests, we reset the camera to its default settings.Shutter Lag: UPDATE (7/22/04): We have updated our shutter lag test method to a more accurate one. For our new test, we start a stopwatch and perform 2 separate tests. For the first test, we pre-focus the camera on the stopwatch display and press the shutter button as soon as the stopwatch displays a new second. This first test will give us the time it takes the camera to actually take a picture after the shutter button is pressed. For the second test, we do not pre-focus the camera. Instead, we fully press the shutter button as soon as the stopwatch displays a new second. This records the time it takes the camera to focus and take a picture. We perform both of these tests 3 times and review the pictures. The 3 times for each test are averaged.
Our previous shutter lag test included the use of Ed Schwartz's Shutter Release Test.
Startup Time: In order to test a camera's startup time, we measure the amount of time it takes from the moment we turn on the power to the moment the camera is able to take a picture. We first disable the flash and auto-focus. We then turn the camera off and wait two seconds. We start a timer and turn on the camera at the same time. For some cameras, if you hold down the shutter release button, it will take a picture as soon as it can. For cameras like this, we simply hold down the trigger button and stop the timer as soon as the camera begins to take a picture. For other cameras, we press the shutter release button repeatedly as fast as we can until it takes a picture. We perform this test three times and calculate the average.
Disk Write Times: First, we set the camera to the highest quality setting (compressed). We take a picture and start the timer as soon as the "busy" light comes on, indicating disk activity. We stop the timer as soon as the light goes out. Again, we perform this test three times and record the average.
Image Quality Tests
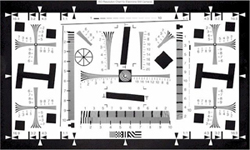
In order to test image quality, we have devised three tests that will each focus on different points of quality. For all of our studio shots, we reset the camera to its default settings and turn off the flash.ISO 12233 IEEE Approved Resolution Chart: We use this chart to test the camera's ability to resolve fine lines.
|
For this test, we use the camera's manual WB (white balance) if available. The camera is set to record at the highest quality setting. We use our default lighting setup (3-500 watt tungsten studio lights reflected off a white ceiling for even lighting). Then we take a look at the image and analyze the results. |
GretagMacBeth ColorChecker: This chart is used to test the camera's ability to represent realistic colors.
| For this test, we the use camera's highest quality setting (compressed). If the camera offers a manual white balance option, we take two pictures: one with Auto WB and one with manual WB. If the camera doesn't have an option for manual WB, we will use the Auto setting. Then we compare the results to the exact RGB color values to see how well the camera performs in comparison to the true colors. We use the same default lighting setup for the color test. |
|

Noise: For our noise test, we shoot a more practical scene that we have created in the studio. It is an image that we can recreate with all of our cameras as a means of comparison.
| For the noise test, we set the camera to the highest quality recording setting (compressed) and Manual WB (if available). We then take pictures using a range of different ISO settings to compare noise levels. In designing this scenario, we picked objects that we thought would test the camera's overall ability to represent detail, tonal range, and general image quality. Again, we use our default lighting setup for the studio shot. |
|

Built-in Flash
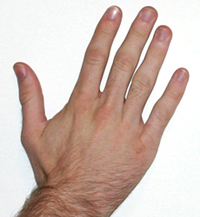
Our flash test is simply a picture of our hand to analyze the camera's tonal accuracy when using a flash.
|
We set the camera to a fully automatic mode and use the highest quality setting (compressed). The camera is positioned five feet from our hand. For this test, we use low ambient tungsten house lighting and the camera's built-in flash. The purpose of this test is to give an example of the camera's ability to replicate skin tones accurately with the flash. |


7 Comments
View All Comments
GOSHARKS - Thursday, July 8, 2004 - link
ianmills - heavily biased? i have yet to see any sort of bias on the largest and most popular digican review sites (dpreview, dcresource, imaging resource, steves digicams, megapixel.net, etc)ianmills - Wednesday, July 7, 2004 - link
Most sites that review digital cameras are HEAVILY BIASED. Let's hope Anandtech can be more objective than the other sites in their reviews.I just skimmed the article quickly (so you may have already included this), but I WOULD LIKE TO SEE a test of how long you need to wait between each picture that is taken. I have a a Canon A300 and it takes almost 10s between each picture when the flash is used ><
Unfortunately none of the camera review sites mentioned this flaw (but otherwise the camera is good ^^)
PrinceGaz - Monday, July 5, 2004 - link
I've got to agree with those who wonder what AT can add to the already well catered for online digial-photography sector. Sites like imaging-resource.com and others mentioned in earlier comments have many in-depth reviews every month so that they cover pretty much every digital camera available. They specialise in nothing but digital photography and everyone involved with the site is an expert in it, who knows about every product available together with its strengths and weaknesses and together can give an informed opinion.AT is a site which covers computers and the people who do the reviews here are all experts on computers in much the same way. Thats what makes this site one of the top PC hardware sites on the net.
Although digital photography using computer equipment may make it seem like the two are similar and can be covered together, doing so is a bit like a site which specialises in cars deciding to look at a few caravans as well. Yes you need a car to pull a caravan, but the two are used for quite different purposes and need to be considered entirely seperately, except for a mention of what power of car is needed to tow a particular caravan.
Unless AT is prepared to create what will need to be at least as equally large a site as the existing AT covering nothing but cameras, something like anandtech-cameras.com for instance, the camera reviews will be of very little value. I'm sorry to sound pessimistic about this new part of AT, but its just far too large a field to hope to cover without more than doubling in size. Theres a real danger of being seen as a jack of all trades...
shuttleboi - Monday, July 5, 2004 - link
I doubt a gadget website like Anandtech has anything of value to add over the content found in DPReview.com and others, but just in case the author(s) are working in earnest: One test that needs to be added is a luminance test to show a digicam's noise sensitivity to higher ISO. Such a test will reveal how digital SLRs like the Canon 300d/10d and Nikon d70/d100 stand out from point-and-shoot cameras and even mid-range cameras like the Sony 828. The light sensors in digital SLRs are much larger than those found in smaller digicams, thereby allowing users to dial up higher ISO without nearly as much noise. For example, by going from ISO 100 to 800, you've gained 3 stops of overexposure, so you can reduce your shutter speed by 3 stops, which is invaluable when you're in low-light situations. Digital SLRs have little noise at ISO 800, whereas cameras with smaller sensors (even the Sony 828 or Canon PowerShot Pro1) produce fairly noisy images even at ISO 200. Even at ISO 1600, my Canon 300d produces acceptable results not much worse than the grainy slide film in my old film SLR.jliechty - Monday, July 5, 2004 - link
Hmm, it looks like the new system is chopping off extra paragraphs in commments. There should be a second paragraph to this comment.jliechty - Monday, July 5, 2004 - link
#1 - I don't know for sure, but it will be interesting to see what they come up with.LX - Monday, July 5, 2004 - link
Between full-time digicam review sites like dpreview.com, imaging-resource.com, dcresource.com, megapixel.net and steves-digicams.com what can you add to the mix?