ASUS P5E3 Deluxe Overclocking: DDR3 Takes Front Stage
by Kris Boughton on November 20, 2007 4:00 AM EST- Posted in
- CPUs
ASUS P5E3 Deluxe BIOS Setup and Tweaking
Of all the board manufacturers, ASUS seems to have captured the market on the use of proprietary names for several of their BIOS functions. The first order of business is to understand what it is we will be manipulating (hopefully for the better). The best way to go about this is to lay it all out and go straight down the list. We will do our best to explain what ASUS is trying to convey with their particular naming scheme, what the settings actually change, and finally, when you want to make use of each setting.
Ai Tweaker Menu
Ai Overclock Tuner: Auto, Manual, and XMP. Auto runs the board at default (optimal) settings with no overclock, Manual allow the user to set each individual overclocking parameter and XMP instructs the board to attempt to set CPU and MCH parameters as necessary in order to configure the system to operate the memory as defined by one of the memory's pre-programmed eXtreme Memory Profiles.
eXtreme Memory Profile, or XMP, is Intel's version of the same experience offered by NVIDIA's EPP (Enhanced Performance Profile), in which memory overclocking settings - including frequency, timings, and voltages - are programmed into the memory module's SPD chip. Assuming the CPU is capable of supporting the profile, selecting either Profile #1 or Profile #2 (as they exist) gives the user an easy way to experience overclocking without getting too involved in the setup process.
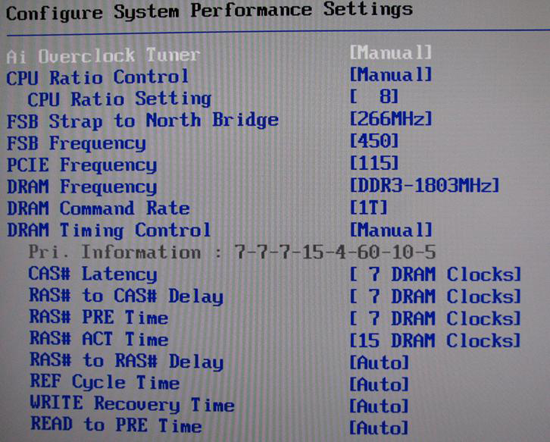
After selecting Manual the following options become available for change:
CPU Ratio Control: Auto and Manual. Selecting Manual allows for altering the CPU's operating multiplier. Leaving this set to Auto instructs the BIOS to use the CPU's default multiplier, or in the case of XMP operation, to select a multiplier that would most closely maintain the default CPU frequency when automatically overclocking the memory.
CPU Ratio Setting: Available options range from 6 to the installed CPU's default multiplier (in the case of the Q6600 this would be 9). Extreme-series CPUs (QX6850, QX9650, etc.) are also upwards unlocked and can be set as high as 31x.
FSB Strap to Northbridge: Auto, 200, 266, 333, and 400. There once was a time when this single setting controlled a whole series of MCH performance configuration registers. Implemented in its current form, this option does little more than determine what memory dividers are available for use. Lower straps can impose early front side bus (FSB) limitations - if you experience problems, choose the next higher strap and select the appropriate divider to keep your memory frequency at an achievable target. The general practice when overclocking is to keep the strap as low as possible after setting an acceptable CPU and memory speed. The P5E3 seems to break this wisdom and often performs best using the 333 strap regardless of FSB speeds.
FSB Frequency: This value, when multiplied by the CPU Ratio Setting, sets the processor frequency. For example, 400 FSB x 9 = 3.6GHz. This setting, along with the FSB Strap to Northbridge, influences what DRAM Frequency(s) are available for selection. (Most 65nm quad-cores are FSB limited by this board to around 480-500MHz without serious tweaking and voltages.)
PCI-E Frequency: Set no higher than 115-118MHz and you may see a small increase in 3D game/benchmark performance. Exceeding this recommendation will cause problems with the Southbridge to Northbridge DMI interface making it appear as though attached peripherals, including hard disk drives, have failed.
DRAM Frequency: Choose from those listed to set the system DDR memory frequency. Altering the FSB Frequency or FSB Strap to Northbridge settings will influence the selections available. Refer to the table above when targeting a specific memory speed. For example, if the 333 strap is selected with an FSB setting of 400 then the list would contain the following selection choices: 2 x 400 FSB x 1/1 = DDR-800, 2 x 400 FSB x 6/5 = DDR-960, 2 x 400 FSB x 8/5 = DDR-1280, and 2 x 400 FSB x 2/1 = DDR-1600.
DRAM Command Rate: Auto, 1T, and 2T. Incorrectly labeled as 1T and 2T, these settings are really 1N and 2N, as implemented by the Intel X38 MCH. Auto allows the BIOS to assign the value automatically based on FSB Strap to Northbridge and final memory frequency. In most cases, system stability is not affected and a 3-5% improvement in memory bandwidth boost is available when set to 1N.
DRAM Timing Control: Auto and Manual. Auto allows the BIOS to read and set all primary and secondary timings for the installed memory as detailed by SPD. Manual gives the user control over individual memory timings while allowing the option of having some timings remain automatically assigned based on programmed values. In most cases the only timings that need to be manually configured are: CAS# Latency (tCL), RAS# to CAS# Delay (tRCD), RAS# PRE Time (tRP) and RAS# ACT Time (tRAS) - leave all others sub-timings set to Auto unless you have a good reason for changing them.
Of all the board manufacturers, ASUS seems to have captured the market on the use of proprietary names for several of their BIOS functions. The first order of business is to understand what it is we will be manipulating (hopefully for the better). The best way to go about this is to lay it all out and go straight down the list. We will do our best to explain what ASUS is trying to convey with their particular naming scheme, what the settings actually change, and finally, when you want to make use of each setting.
Ai Tweaker Menu
Ai Overclock Tuner: Auto, Manual, and XMP. Auto runs the board at default (optimal) settings with no overclock, Manual allow the user to set each individual overclocking parameter and XMP instructs the board to attempt to set CPU and MCH parameters as necessary in order to configure the system to operate the memory as defined by one of the memory's pre-programmed eXtreme Memory Profiles.
eXtreme Memory Profile, or XMP, is Intel's version of the same experience offered by NVIDIA's EPP (Enhanced Performance Profile), in which memory overclocking settings - including frequency, timings, and voltages - are programmed into the memory module's SPD chip. Assuming the CPU is capable of supporting the profile, selecting either Profile #1 or Profile #2 (as they exist) gives the user an easy way to experience overclocking without getting too involved in the setup process.
After selecting Manual the following options become available for change:
CPU Ratio Control: Auto and Manual. Selecting Manual allows for altering the CPU's operating multiplier. Leaving this set to Auto instructs the BIOS to use the CPU's default multiplier, or in the case of XMP operation, to select a multiplier that would most closely maintain the default CPU frequency when automatically overclocking the memory.
CPU Ratio Setting: Available options range from 6 to the installed CPU's default multiplier (in the case of the Q6600 this would be 9). Extreme-series CPUs (QX6850, QX9650, etc.) are also upwards unlocked and can be set as high as 31x.
FSB Strap to Northbridge: Auto, 200, 266, 333, and 400. There once was a time when this single setting controlled a whole series of MCH performance configuration registers. Implemented in its current form, this option does little more than determine what memory dividers are available for use. Lower straps can impose early front side bus (FSB) limitations - if you experience problems, choose the next higher strap and select the appropriate divider to keep your memory frequency at an achievable target. The general practice when overclocking is to keep the strap as low as possible after setting an acceptable CPU and memory speed. The P5E3 seems to break this wisdom and often performs best using the 333 strap regardless of FSB speeds.
| Memory Divider Ratios Available by FSB Strap (DRAM:FSB) | |
| 200 | 5:3, 2:1 |
| 266 | 5:4, 3:2, 2:1 |
| 333 | 1:1, 6:5, 8:5, 2:1 |
| 400 | 1:1. 4:3, 3:2, 2:1 |
FSB Frequency: This value, when multiplied by the CPU Ratio Setting, sets the processor frequency. For example, 400 FSB x 9 = 3.6GHz. This setting, along with the FSB Strap to Northbridge, influences what DRAM Frequency(s) are available for selection. (Most 65nm quad-cores are FSB limited by this board to around 480-500MHz without serious tweaking and voltages.)
PCI-E Frequency: Set no higher than 115-118MHz and you may see a small increase in 3D game/benchmark performance. Exceeding this recommendation will cause problems with the Southbridge to Northbridge DMI interface making it appear as though attached peripherals, including hard disk drives, have failed.
DRAM Frequency: Choose from those listed to set the system DDR memory frequency. Altering the FSB Frequency or FSB Strap to Northbridge settings will influence the selections available. Refer to the table above when targeting a specific memory speed. For example, if the 333 strap is selected with an FSB setting of 400 then the list would contain the following selection choices: 2 x 400 FSB x 1/1 = DDR-800, 2 x 400 FSB x 6/5 = DDR-960, 2 x 400 FSB x 8/5 = DDR-1280, and 2 x 400 FSB x 2/1 = DDR-1600.
DRAM Command Rate: Auto, 1T, and 2T. Incorrectly labeled as 1T and 2T, these settings are really 1N and 2N, as implemented by the Intel X38 MCH. Auto allows the BIOS to assign the value automatically based on FSB Strap to Northbridge and final memory frequency. In most cases, system stability is not affected and a 3-5% improvement in memory bandwidth boost is available when set to 1N.
DRAM Timing Control: Auto and Manual. Auto allows the BIOS to read and set all primary and secondary timings for the installed memory as detailed by SPD. Manual gives the user control over individual memory timings while allowing the option of having some timings remain automatically assigned based on programmed values. In most cases the only timings that need to be manually configured are: CAS# Latency (tCL), RAS# to CAS# Delay (tRCD), RAS# PRE Time (tRP) and RAS# ACT Time (tRAS) - leave all others sub-timings set to Auto unless you have a good reason for changing them.


25 Comments
View All Comments
frede86 - Tuesday, September 2, 2008 - link
hey folksnice guide u made there m8.
but ive tryed to use that setup u recomment.
but doenst work. how come? is it because i use a dou core E8500?
Cheers
frede86 - Tuesday, September 2, 2008 - link
Core 2 dou*cEvin Ki - Saturday, February 23, 2008 - link
after reading the information on the AI transaction booster, and the Memset program, i decided to brave up, and give it a go. Memset indicated that my performance level was a 7. as my ddr2 CAS was 4, i assumed that the bios was relaxing my system a little. i simply disabled the booster option in bios with a relax of zero. rebooted, and re-ran Memset. nothing had changed. still a 7. any settings other than disabled and zero, in bios, will not POST. Memset allowed me to change the performance level to 6, apply, and save the change. nothing has changed in bios as a result of that change.my question is, what am i doing wrong, as i would expect to have seen something different in Memset with changing the bios to disabled and in effect lessening the relax?
i apologize if i have somehow missed the whole point, and do not understand this memory tweaking concept.
thanks
jwigi - Thursday, February 14, 2008 - link
Hi I have a P5k Premium and the contact between the heatsinks and the board aren't very good, i was wondering what size of screw you used and also if you needed to put any springs on them, i'm thinking of doing the same 'mod' you've done in your article on my board...thanks
plextor10000 - Thursday, January 10, 2008 - link
I was already one day playing with the settings of the mainboard, first tried to boost the E6850 from default 3Ghz to 3.6 , but could not make it stable in benchmarksSwitched to the Q6600 - and followed the guide , decrease the voltage for the CPU to 1.375 , for safety .
After step by step, i increased from 2.4 without any issue to 3.6 , running stable with my patriot 1333 on 1600
Thank you for this guide. Can i use the same settings for the E6850 also , or do i modyfie some settings to blaze the clocks of it ??
Ryujin - Sunday, January 6, 2008 - link
I recently got this board, and after reading this article, I really want to follow the advice therein and remove the thermal pads underneath the heatpipes/heatsinks and replace them with thermal paste, and replace all the plastic push-pins with screws/nuts.I've yet to start fiddling with the board, as I am still waiting for the CPU to arrive. A few pieces of advice I was looking for to ease my mind though:
- Would I be mad using Arctic Silver thermal compound, considering conductivity issues? (I could get ceramique, which is non-conductive, but it'll take quite a while, through the channels I wish to use).
- What diameter / length screws do you recommend? I figure 10mm M3 screws with lock nuts should do the trick... If they're too long, I should be able to screw them in with the heads facing the MB-tray.
- I'm going with a liquid cooling solution for my CPU. The P5E3 Deluxe included two fans that can be placed atop the heatsinks surrounding the CPU-socket for just such an occasion. However, I suspect they're rather noisy (are they?). Also, the case I'm using is the Coolermaster Cosmos, which does have ample chassi fans, so I'm wondering it is really necessary (time will tell, but I was wondering if anyone has any opinions on the subject).
cheers
kmmatney - Tuesday, November 20, 2007 - link
OK, looking at the graphs, it just seems like all I'm seeing is the benchmarks getting better with higher overall cpu speed. The overclocking guide was good, but the benchmarks are hard to figure out, since memory speed and cpu speed are getting higher at the same time.kmmatney - Tuesday, November 20, 2007 - link
OK, figured it out - we just need to compare the Asus P5E3 scores versus the Asus Maximums scores at (8 X 465) to see how much DDR3 improves things over DDR2. Seems to be 1%-5%. Yawn...TA152H - Tuesday, November 20, 2007 - link
When I read the article for the x48, I mentioned that it made no sense for the three chipsets unless the x48 was DDR3 only. Well, I have found out from another site that it will be DDR3 only.That makes the x38 really only useful as a DDR2 chipset, after the x48 is available. This assumes Intel did the right thing of course, and all the ugly overhead for DDR2 is removed from the x48. But if it is, you'd have to be a fool to buy the x38 with DDR3, since it is second best, and has overhead from a function that will not be present on the motherboard. It will give you more heat, and more power use for something that is completely useless. I didn't like Intel including both, but I guess it was to transition to DDR3, so it was a necessary evil until the x48 comes out.
retrospooty - Friday, November 23, 2007 - link
actually, that isnt true. X48 is just an X38 selected out of speed bin to be the fastest. They were going to market it as only DDR3 (that was a marketing decision not a functionality decision) but have since changed their minds.http://www.fudzilla.com/index.php?option=com_conte...">http://www.fudzilla.com/index.php?optio...amp;task...
Either way your arguments are pretty one sided. Even with DDR3 highly overclocked to 2ghz its really only a slight bit faster then DDR2. In fact DDR2 at 1000mhz 4-4-4 beats DDR3 at 2000mhz @ 9-9-9 in most real world tests and apps. Intel is currently going with tri-channel DDR3 on the next gen CPU (nehalem) with internal memory controller. Then and ONLY then is DDR3 going to be worthwhile, and even then its only worthwhile because Nehalem chipsets wont support DDR2. DDR3 is a minor speed bump not worthy of spending money on until Nehalem comes out.