GIGABYTE G1.Sniper Z87 Review
by Ian Cutress on February 24, 2014 2:00 PM EST- Posted in
- Motherboards
- Intel
- Gigabyte
The G1 series from GIGABYTE has seen a recent expansion of late – from the previous socket to new chipset releases, GIGABYTE is now attempting to provide a model at almost every reasonable price point in the market. The purpose of this is to provide a gaming platform for any budget, using gaming features such as OP-AMP, USB-DAC.UP and Gain Boost. At the mid point of the spectrum is the G1.Sniper Z87, which we are reviewing today.
As we have discussed in previous publications on AnandTech, attempting to decipher the benefit of an audio solution can be a difficult task. On a recent post where we asked for our reader input, there were substantial numbers in all three categories – (i) Onboard audio is good enough, no need to test it; (ii) Keep going with similar tests, it is good to see some data; and (iii) These tests show almost nothing about the audio that audiophiles care about. So when GIGABYTE is supplying us with their gaming motherboard that has a frontal focus on audio, trying to quantify the audio gains as such can be difficult. Luckily, the focal points of GIGABYTE’s audio engineering additions are actually tangible that we can play with, rather than merely ‘part of the design’.
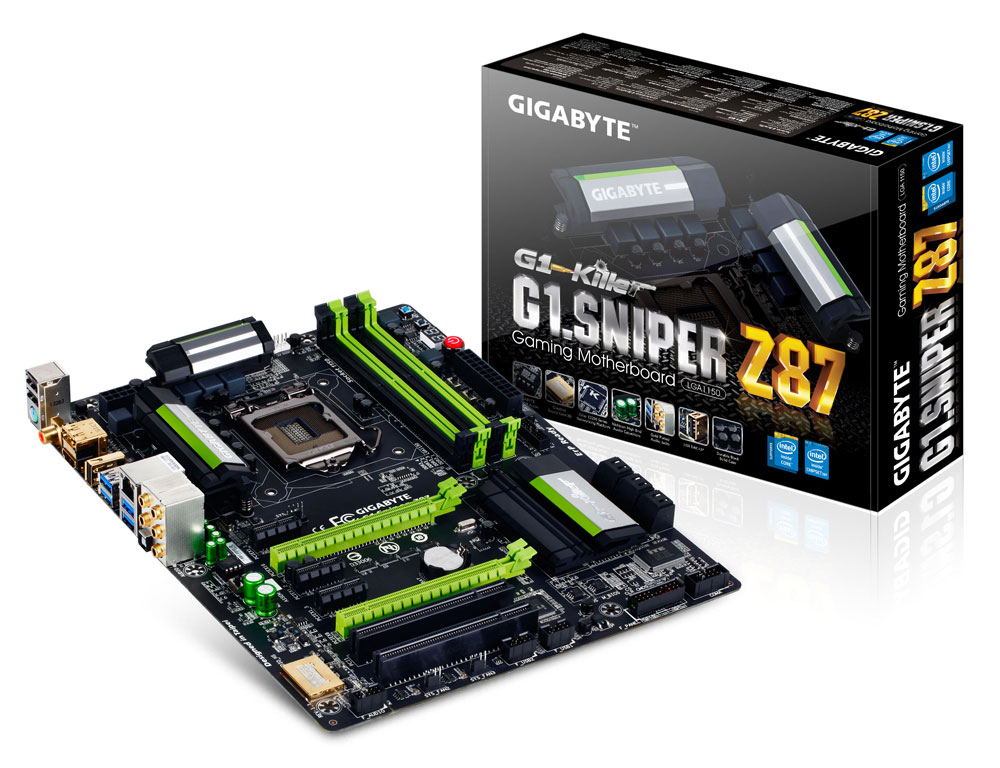
GIGABYTE G1.Sniper Z87 Overview
The focus on the Z87 line of GIGABYTE G1 motherboards is the audio, where GIGABYTE is using a range of high end audio chips along with a range of simple to complex additions to help improve the quality and feature set of the audio. For the G1.Sniper Z87 (not to be confused with the G1.Sniper 5, G1.Sniper M5, G1.Sniper Z5 or G1.Sniper Z5S, all of which exist), this means:
- A Creative Sound Core 3D audio codec,
- The analog audio pathways separated from the digital signals on the PCB (what GIGABYTE call the ‘audio noise guard’),
- Front Audio Headphone Amplifier (600ohm support),
- Audio Gain switches to boost rear headphone output,
- Swappable OP-AMP technology on the rear audio.
The use of the Creative Sound Core 3D audio codec allows GIGABYTE access to the Creative software stack in the OS, with features like CrystalVoice, WhatUHear and other Creative IP. This includes a form of internal feedback that can cause issues when benchmarking the audio (and giving -132 dB SNR results, rather than ~100 dB which is realistic), but aims to give an immersive experience to the user.
We have come across PCB separation on many other Z87 motherboards before, with the aim of reducing inductive noise components when digital and analog signal carriers are close to each other. Headphone amplifiers are self-explanatory as well.
On the Audio Gain switches, GIGABYTE offers two modes: 2.5x and 6x, with 2.5x by default. This causes an onboard boost in signal strength to the audio outputs, but does not filter out the noise – as far as I can understand it, it is just an amplifier setting.
GIGABYTE actually visited Anand at Haswell launch to show him the swappable OP-AMP technology (video, 26:40 onwards). The basis for this is the amalgamation of the analog frequency signals into a single output on the rear of the motherboard. Different operational amplifiers (op-amp) have different ideal frequency ranges, and thus by offering a swappable system, a user can apply one more suited to their range of music. This is a common feature on audiophile equipment, so GIGABYTE decided to integrate the technology onto their motherboards. The default OP-AMP on the G1.Sniper Z87 is a Burr-Brown, and GIGABYTE will sell you a set of three (with an IC changer) for an MSRP of ~$50.
The motherboard itself is designed for dual-GPU use, giving three PCIe x1 slots and two PCI slots for other modern and legacy hardware. We have the six SATA 6 Gbps ports and 6 USB 3.0 ports from the chipset with no additional controllers, indicating the position of the G1.Sniper Z87 in the Intel 8-series line-up. Alongside the audio and PCIe configuration, I am glad to see the onboard power/reset/Clear_CMOS buttons, along with the Dual BIOS technology that GIGABYTE uses. The rear IO is also enhanced by gold-plated connectors for video and audio in order to avoid corrosion that might diminish the experience over time.
For performance, the G1.Sniper Z87 uses MultiCore Turbo by default, giving our i7-4770K CPU maximum Turbo no matter how we pushed the CPU. This causes better performance over motherboards that do not implement this feature, however the power consumption at load may increase as a result. Despite using the Creative audio codec, the dynamic range of the G1.Sniper Z87 was lower than expected, however in contrast GIGABYTE should be commended for the number of automatic overclock options in both the BIOS and OS.
Overclock performance on our CPU was lower than expected, however both our manual testing and the automatic overclock options hit 4.5 GHz within our imposed 90ºC temperature limit. Also worth mentioning is the effect of trying to set the CPU speed below 4.2 GHz. At any setting below 4.2 GHz, the system refused any voltage setting we placed, and set the system to automatic voltage.
The GIGABYTE G1.Sniper Z87 does what it sets out to do – provide the backbone of a system running a single or dual GPU setup with enhanced audio features, giving gold plated connectors to maintain the experience in climates conducive to port corrosion. At stock settings it provides a good level of performance when paired with a high-end CPU, and allows for a reasonable overclock. The main competition for the G1.Sniper Z87 is ASRock’s Z87 Killer, Z87 Professional and MSI’s Gaming range, some of which we have in for review.
Visual Inspection
A large part of modern motherboard design is in the aesthetics, especially when we discuss individual system builders or combinations with voyeuristic cases. GIGABYTE’s tack with the Sniper range is a bright green on their gaming range, whereas other manufacturers seem to prefer red.
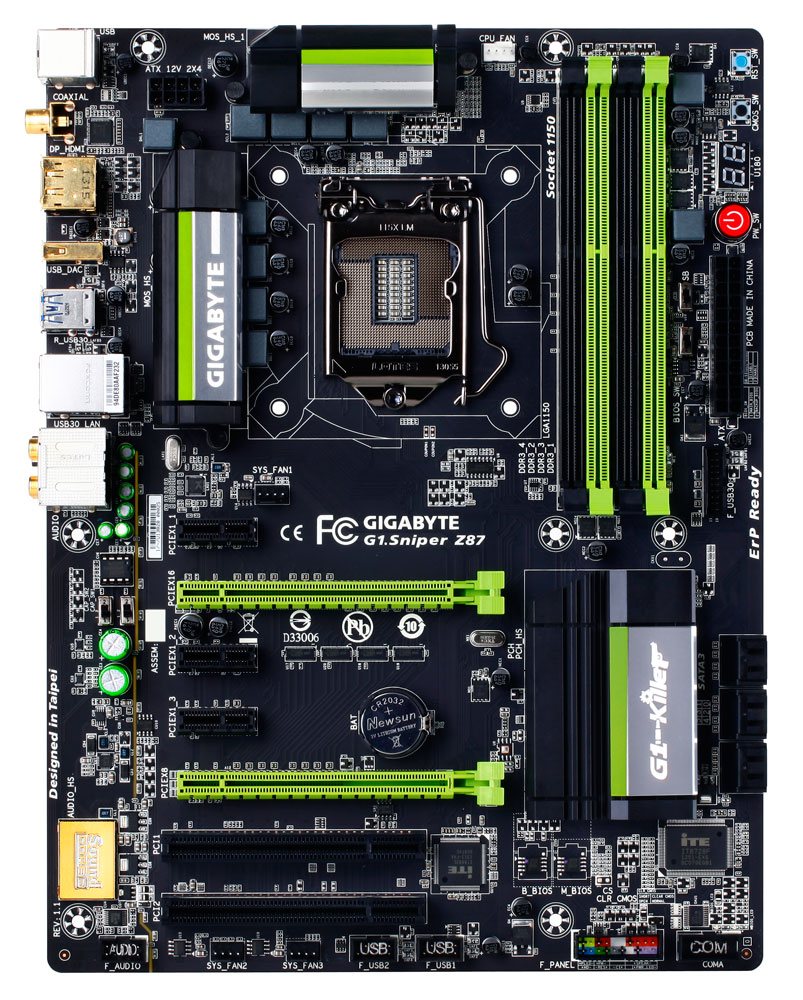
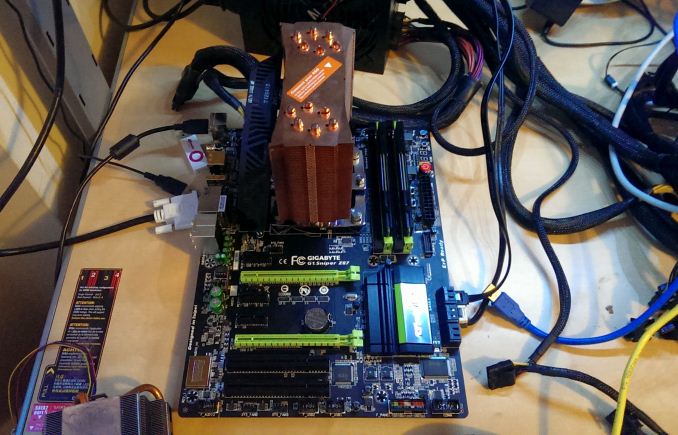
At this price point GIGABYTE is not using their higher-end 60A IR355x ICs in the power delivery, however the power system is catered for by branded heatsinks that are not connected to each other. The heatsink to the left sits against the Intel socket limit boundary, whereas the one above has some small room – I had no issues using large CPU coolers however. To the right of the top heatsink is the 4-pin CPU fan header, in white to contrast itself against the rest of the motherboard: perhaps useful for users with hands inside a dark case.
The motherboard has four fan headers in total, all 4-pin, although only two are within reach of the socket area. Aside from the CPU fan header already mentioned, a SYS fan header sits below the socket and above the first PCIe 2.0 x1 slot. The final two fan headers are at the bottom of the board, underneath the PCI slots. Ideally we should have a couple more fan headers on a motherboard this size.
Moving clockwise around the motherboard, the DRAM slots use double-sided latches, respective perhaps of the price bracket but the first PCIe slot is a reasonable distance away such that the latches should not cause any obstructions (or vice-versa). The blue button at the top right is the reset button, followed by a black Clear_CMOS button, a two-digit debug LED and a big red power switch. The 24-pin ATX power connector is underneath, followed by a USB 3.0 header powered by the chipset.
The chipset itself is underneath a themed heatsink, and as the heatsink does not have to additionally cool any controllers, it is not connected to others on the motherboard. Below the heatsink are two BIOS chips soldered on board, part of GIGABYTE’s DualBIOS paradigm on almost all of their mainstream range above $60. The six SATA 6 Gbps ports are to the right of the chipset heatsink, and the SuperIO iTE chip is underneath – normally this is located in the audio area or between the PCIe, but due to the audio improvements has been moved here.
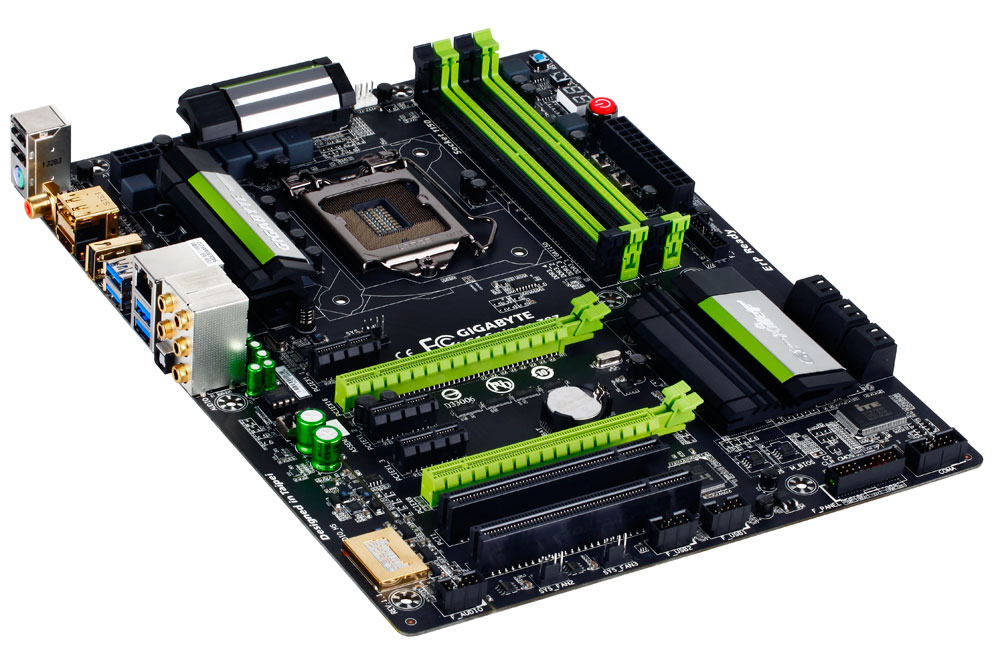
The bottom of the motherboard has a COM header, the front panel audio connector, two USB 2.0 headers, two four-pin fan headers and the front panel audio header. PCIe layout is primarily for dual GPU setups, with both Crossfire and SLI supported (sometimes with this PCIe layout a manufacturer will go x16 + x4 rather than x8/x8, meaning no SLI support). The addition of PCI via a bridge chip is for legacy purposes, where some users still require a PCI to (insert port here) card.
The main focal point of the engineering of the G1.Sniper Z87 is the audio:
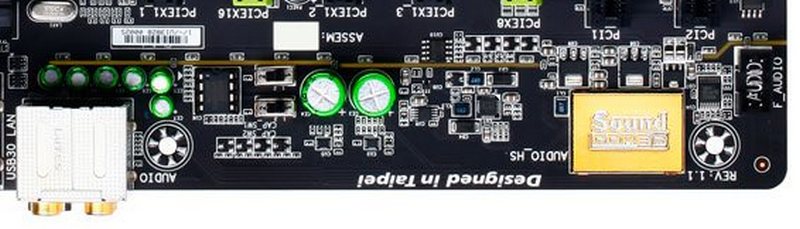
Here we have the audio output jacks, followed by several electrolytic capacitors. The removable operational amplifier is next – we had a Burr-Brown in our motherboard and users are encouraged to purchase one more suited to their music tastes. GIGABYTE will sell an upgrade kit with three different OP-AMPs, including a handy tool to switch them out with. The next two switches are for additional headphone gain – in the down position (as we normally look at a motherboard), the gain for the headphone port at the rear is set at 2.5x; when both in the up position, the gain for this port is set at 6x. Following another pair of filter caps, the Sound Core 3D audio codec is found underneath the electromagnetic shield, designed to help reduce outside EM interference. Beside this is a headphone amplifier for the front audio outputs. The whole audio sub-system is separated from the main PCB, such that the digital signals on the motherboard do not induce noise in the analog audio signals.
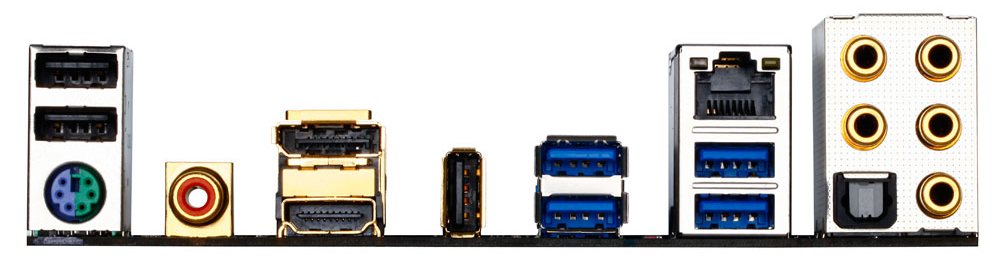
For the rear of the motherboard, this is more defined by price point – two USB 2.0 ports, a combination PS/2 port, a coaxial SPDIF output (gold plated), video outputs (HDMI/DisplayPort, gold plated), a USB 2.0 port used for the USB-DAC.UP (also gold plated), four USB 3.0 ports (PCH powered), an Atheros Killer E2201 network port and finally the audio jacks, also gold plated.
As mentioned, the gold plating is to reduce long-term corrosion, especially in atypical environments. The USB-DAC.UP port on the motherboard is a USB port with additional power filtering: normally a USB port has to provide power within a certain band (5.0 V +/- some %), however GIGABYTE is using stricter definitions of USB power for this port by attempting to over-engineer it, per se. Unfortunately I do not have the equipment to test this, but it should help USB DAC users have a cleaner power source for their audio.
Board Features
| GIGABYTE G1.Sniper Z87 | |
| Price | Link |
| Size | ATX |
| CPU Interface | LGA-1150 |
| Chipset | Intel Z87 |
| Memory Slots |
Four DDR3 DIMM slots supporting up to 32 GB Up to Dual Channel, 1333-3000 MHz |
| Video Outputs |
DisplayPort HDMI |
| Onboard LAN | Atheros Killer E2201 |
| Onboard Audio | Creative Sound Core 3D |
| Expansion Slots |
2 x PCIe 3.0 x16 (x16, x8/x8) 3 x PCIe 2.0 x1 2 x PCI |
| Onboard SATA/RAID | 6 x SATA 6 Gbps (PCH), RAID 0, 1, 5, 10 |
| USB 3.0 | 6 x USB 3.0 (PCH) [4 back panel, 1 header] |
|
Flex IO x+y+z = 18 |
6 x SATA 6 Gbps 6 x USB 3.0 6 x PCIe 2.0 |
| Onboard |
6 x SATA 6 Gbps 1 x USB 3.0 Header 2 x USB 2.0 Headers 4 x Fan Headers 1 x COM Header 1 x Clear_CMOS Jumper 1 x Power Button 1 x Reset Button 1 x Clear_CMOS Button 2 x BIOS Switches 2 x Audio Gain Switches |
| Power Connectors |
1 x 24-pin ATX 1 x 8-pin CPU |
| Fan Headers |
1 x CPU 3 x SYS |
| IO Panel |
1 x PS/2 Combination Port 2 x SPDIF outputs 1 x DisplayPort 1 x HDMI 4 x USB 3.0 3 x USB 2.0 (one used for USB-DAC.UP) 1 x Ethernet Port (Atheros) Audio Jacks (Creative) |
| Warranty Period | 3 Years |
| Product Page | Link |
While I might be willing to criticize the lack of fan headers or additional controllers on the G1.Sniper Z87, the audio codec and network IC are above standard options. The audio sub-system is also a cost point that required engineering, and it is certainly more welcome than a basic ALC892 setup. It is good to see the power/reset button combination and a two-digit debug LED as well.


36 Comments
View All Comments
Flunk - Monday, February 24, 2014 - link
Really? I didn't know that discrete GPUs used exactly the same chipsets as onboard GPUs and sometimes even inferior DACs. Oh wait they don't, making your comparison ridiculous and nonsensical.apoe - Monday, February 24, 2014 - link
I have used exclusively sound cards for almost a decade. The first time I went from onboard to discrete, I was using a 5.1 system and the difference was massive. Recently I plugged my Beyer DT770s into the onboard (ALC1150) just to see how bad it was... and surprisingly, the audio quality was exactly the same. In fact it was better, since the sound card (HTO Striker) would pick up EM interference resulting in a buzzing noise whenever the frame rate went >140 fps in any game, yet this didn’t happen with the onboard audio. This buzzing under load is apparently still a common problem with discrete cards, which I guess is why some of them have shielding now.Kaihekoa - Monday, February 24, 2014 - link
Have you tested this theory recently? The tech has made good progress. In my experience, the biggest difference in sound quality comes from the speakers/headphones these days.Samus - Monday, February 24, 2014 - link
Totally, it takes a hell of a pair of phones or speakers to actually measure the SNR difference from one audio codec to another. Most of it comes down to capacitor quality these days since many caps aren't even designed for audio. I've replaced caps with Panasonic FM's and still couldn't tell the difference on my Beats (j/k I wear Grado's)lever_age - Monday, February 24, 2014 - link
How are you getting the SNR figure from the graph under the RMAA section? Integrating and A-weighting in your head? Calculating with what?For what it's worth, RMAA is supposedly giving you A-weighted noise and dynamic range figures, which should deemphasize ultrasonics. So the figure for the motherboard as-is should be fine... as fine as RMAA is in general (frequently strange, high on bugs, and low on documentation). Though I believe the weightings are not defined above 20 kHz, so I don't know if they just carry through the equations / curves, notch them out for the actual calculation, or just use the weighting for the 20 kHz and extend it out to the ultrasonics.
popej - Monday, February 24, 2014 - link
RMAA can be configured to compute noise and distortion only in range 20-20kHz. And probably this is default setting, so problem simply doesn't exist. Please check your settings.And of course an attempt to estimate noise floor from the graph is plain wrong.
DanNeely - Monday, February 24, 2014 - link
Have Creative's audio drivers gotten any better in the last 7 years? Their being bad enough in the first part of the prior decade that MS ripped the entire audio sub-system into userland to stop Creative's buggy drivers from BSODing the system is still fresh in my memory; and of more potential concern again now because to improve power management on tablets Win8 has moved the audio sub-system back into the kernel where boggy drivers can crash the system.ViRGE - Monday, February 24, 2014 - link
For what it's worth I've been running an X-Fi Titanium for years without any issues. So I'd say their drivers are fine.As for Vista, my understanding is that it was Realtek that was BSODing everywhere and was the biggest motivation for the audio stack change, not Creative.
Nfarce - Monday, February 24, 2014 - link
Exactly, ViRGE. I've been usinggg an X-Fi Titanium for nearly 5 years now, bought originally and put into a C2D Duo/Vista gaming build, now being used in a near 3 year old i5/Win7 gaming build. No problems. And the sound blows away Realtek. Sounds like user error to me for this guy.angrypatm - Monday, February 24, 2014 - link
I had an X-Fi Titanium and the drivers sucked, and the "critical updates" which would remove the entire program and require full reinstall took longer than loading an O/S -and you had to baby sit through the whole process to click yes or proceed. Afterward, no difference, still clunky and slow, and unreliable. Critical update for a sound card? Never fixed anything. I moved away from Creative to the CMedia based HT Omega Claro Plus, quick uncluttered app, sounds better, and rock solid, NO problems. And creative's crystalizer is btw artificial nonsense.