Nanoxia Deep Silence 6 Review
by E. Fylladitakis on February 13, 2014 3:00 PM EST- Posted in
- Cases/Cooling/PSUs
- Full-Tower
- HPTX
- Nanoxia
- Case
Nanoxia refers to the Deep Silence 6 as a "truly gigantic HPTX case" and it really lives up to the name. Although it can easily be mistaken for a Deep Silence 1 from a simple picture, the proportions of the Deep Silence 6 are massive. Measuring 644mm tall and 655mm deep (25.4" x 25.8"), the Deep Silence 6 is certainly not going to fit into a space designed for standard ATX cases. The truly gigantic part of the Deep Silence 6 however is the weight. At 20.8 kg (45.8 lbs) completely empty, this is one very heavy case and is most certainly not fun to move...unless you're looking for an alternative to weight lifting.
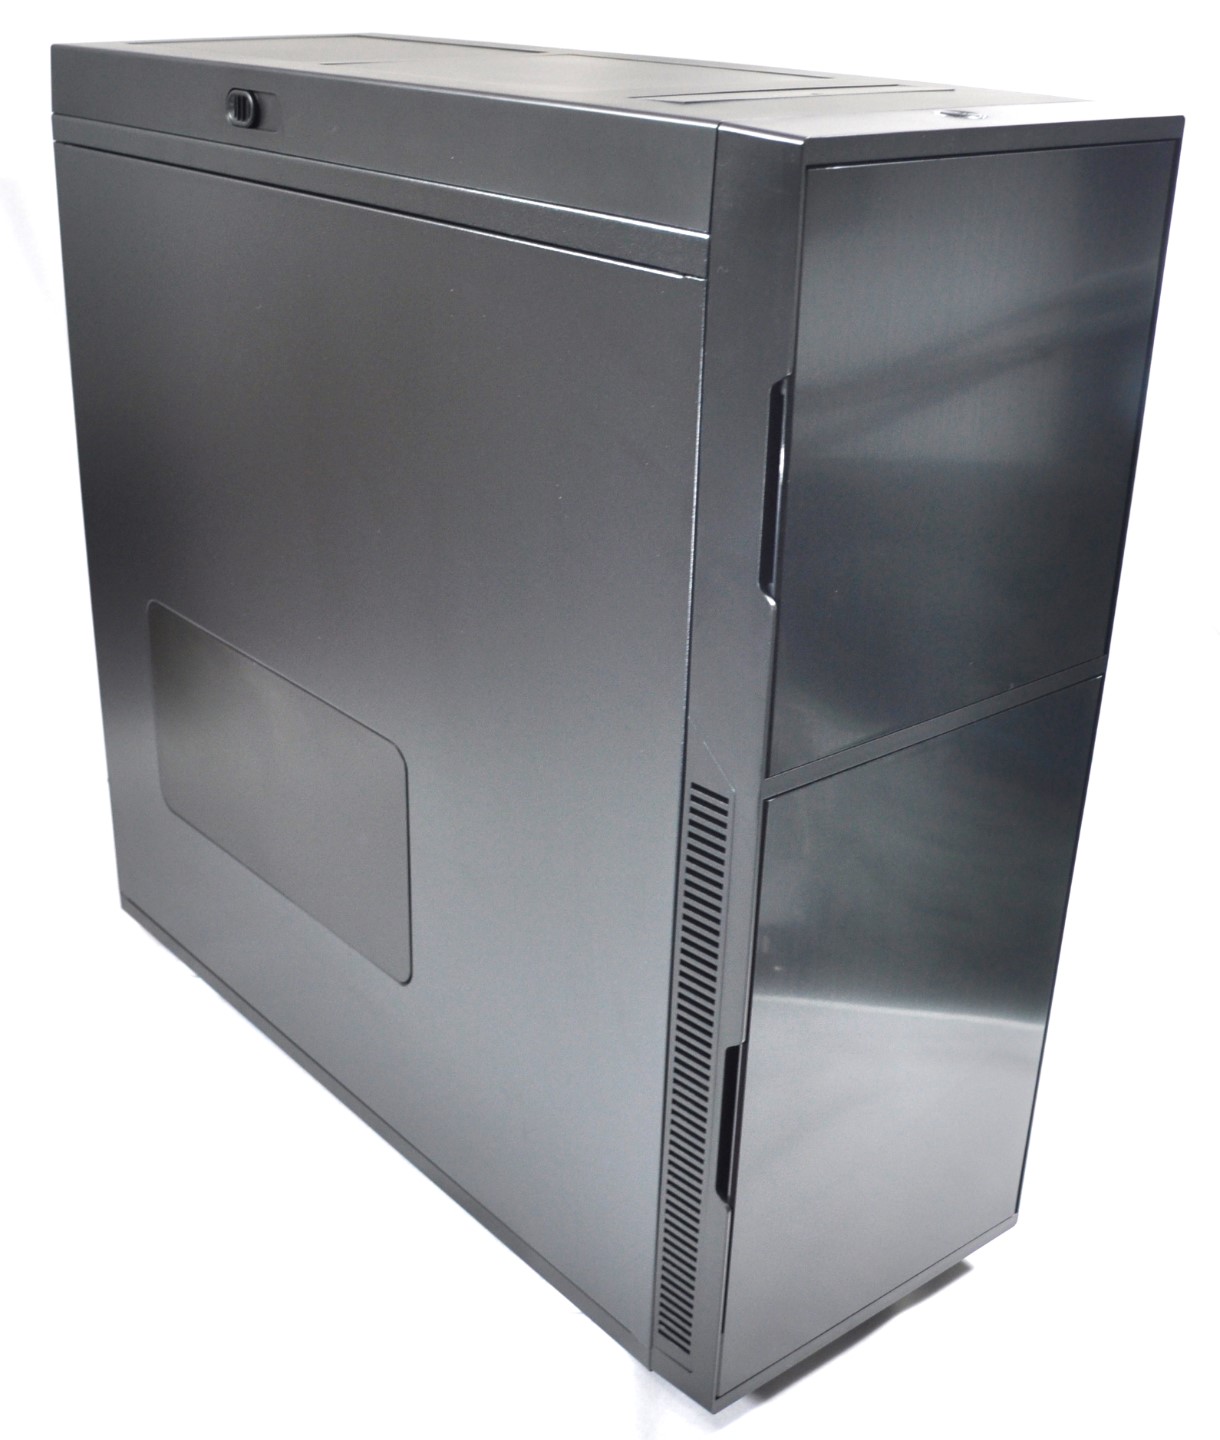
Aesthetically, the design of the Deep Silence 6 is simple yet highly refined, with clean lines and smooth surfaces. We will be reviewing the standard version but Nanoxia also offers a version with a windowed left side panel, as well as a milk-white version. Although the case's frame is made out of 1mm thick SECC steel, the top and front covers of the case are made of plastic, including the doors and the "chimney". These are standard materials for almost every modern PC case, and Nanoxia doesn't break any new ground here.


Both doors are hinged on the right side with magnets holding the doors in place. There's also a layer of sound insulating material applied on the inside of the doors. The top door hides four 5.25" drive bays, two analog fan controllers, and the reset button (and anyone with children will likely appreciate the reset button not being quite so readily accessible). The two top 140mm fans come factory installed, with wiring going to the fan controllers; there's a single 3-pin connector available for a third fan as well. Next to the fan controllers, the logo of the company is embossed on the plastic. The 5.25" drive bay covers are held in place via a plastic lock on their right side and they're easily accessible from the front of the case; all of the drive covers have dust filters installed as well.
The bottom door will most likely be opened far less often than the top door, as it only covers the two 140mm intake fans. The intake is on the side of the case and so the door only needs to be opened if the filters require cleaning. Nanoxia makes the cleaning of the filters -- or even the replacement of the fans themselves -- extremely easy as each fan and filter is attached to its own smaller plastic door. By opening the door, the user can simply pull the filter out and clean it or remove the fan altogether.
The power button can be found at the top side of the plastic front panel, encircled by a green LED. Moving a little towards the rear, the hidden port cluster can be seen, which pops out if pressed. We assume that most of the time it will be left open, as these days it seems almost every user has something connected to a front USB port, yet the option to hide it entirely is certainly welcome. The port cluster offers 3.5mm headphone and microphone jacks, two USB 2.0 ports, and four USB 3.0 ports.


The rest of the top panel is covered by the active "air chimney", which can be opened/closed via the large switch on the side. Nanoxia calls this an "active chimney" because it also acts as a switch, turning off the top panel fans when closed. The switch is very tight but the whole mechanism feels very robust and the panels close firmly, even though all the parts involved are plastic. It is possible to partially open the panels, but it does not make any real sense in our opinion.
We received the windowless version of the case, yet the left side panel has an opening with a plastic cover installed. The plastic cover may be removed, allowing for the installation of two 120mm or 140mm fans. Nanoxia has fan filters preinstalled and waiting; however, cleaning those filters isn't quite as simple as cleaning the the front panel filters, as they are secured with screws between the side panel and the fans. Each time the user wants to clean these two filters, the side panel will have to be removed, then the fans, and only then can you remove and clean the filters. Both side panels also have dense sound insulation applied.
The rear of the case is not very interesting, although it is worth noting the very large ventilation openings next to the expansion card slots and the presence of four round holes for liquid cooling hoses and cables near the top of the case. The four holes are covered with rubber grommets, but if you do not need/want to have openings there at all, you may use the supplied rubber covers to completely seal some or all of the holes.
Wrapping up our external inspection, four tall, nickel-plated feet lift the Nanoxia Deep Silence 6 about two centimeters above the surface. A long air filter comes installed at the bottom of the case as well, for the PSU intake fan and for the optional bottom intake fans. To remove this filter, the user only has to pull it off from the rear of the case, though this is usually not very convenient or even possible without moving the whole case (again, not an easy task for someone my size).


26 Comments
View All Comments
tim851 - Thursday, February 13, 2014 - link
Besides not having any effect on temps, exhausting out the top is bad for noise (in most situations). A case built to be silent should never have top vents.vshah - Thursday, February 13, 2014 - link
One thing missing from the new case review format is pictures of an actual complete install in the case. This was crucial in seeing how cables etc. could be routed with all components in place.E.Fyll - Friday, February 14, 2014 - link
Actually, I skipped such an endeavor thinking that it could be deceiving, as it could appear a lot more messy than it could have become after some care and consideration when routing the cables. On the other hand however, I reconsidered and now think that it would be a good idea to show just how messy things can become. I will plan on adding such info in my future articles.tim851 - Thursday, February 13, 2014 - link
A silent PC was a challenge in 2005 or so. You had to mad, tinker, experiment.Nowadays CPUs and GPUs idle in single watts, good PSUs are semi-passive and half a terabyte of solid state storage are affordable.
Jeffrey Bosboom - Thursday, February 13, 2014 - link
When taking exterior case shots, please include another object so we can get a sense of scale.Sushisamurai - Friday, February 14, 2014 - link
I vote for a coke canredmist77 - Friday, February 14, 2014 - link
Great suggestion!E.Fyll - Friday, February 14, 2014 - link
That sounds like a good idea. Coke can it is, I suppose. Its size is universal. :)Slash3 - Friday, February 14, 2014 - link
Everyone knows that the standard measurement of scale is a banana...http://knowyourmeme.com/memes/banana-for-scale
c4v3man - Thursday, February 13, 2014 - link
I have a Deep Silence 2 case, and while it's a decent case, it's not perfect. On the Deep Silence 2 at least, the air chimney at the top stays open well enough, but I would prefer a reassuring "click" at the top. The hard drive bays (of which there are many) are designed in such a way that they block a lot of airflow... I would prefer a more skeleton-ized design, to let the air move through. And finally, while the doors have a satisfying heft to them, they use a latching system similar to cheap cases today, and of a decade ago. When spending this much of a case, I want the doors to go on with zero hassle. They're not the worst I've ever used, but certainly not the best design.