Intel Z87 Motherboard Review with Haswell: Gigabyte, MSI, ASRock and ASUS
by Ian Cutress on June 27, 2013 8:00 AM EST- Posted in
- Motherboards
- Intel
- MSI
- Gigabyte
- ASRock
- Asus
- Haswell
- Z87
- Shark Bay
- Lynx Point
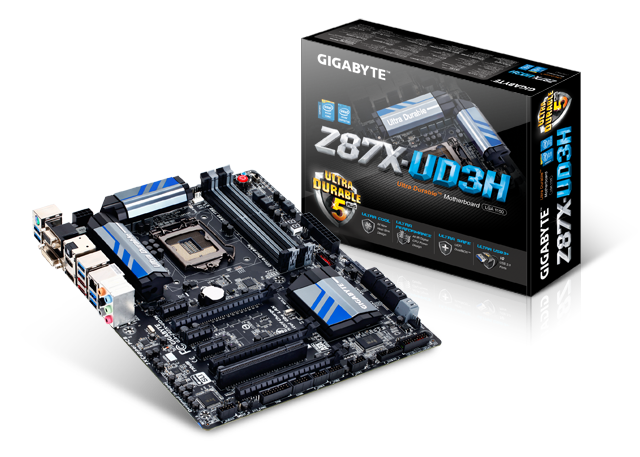
Gigabyte Z87X-UD3H Overview
In our review today, the Gigabyte Z87X-UD3H comes in under the radar. On the face of it we have a motherboard that does not to attempt to strike the user visually like some of the others; however it does run our gamut of benchmarks with very few issues.
In terms of connectivity we get an Intel NIC, a total of eight SATA 6 Gbps ports (6 Intel, 2 from controller), ten USB 3.0 ports (four Intel, six from controllers), a Realtek ALC898 audio codec, six fan headers and a PCIe 3.0 x8/x8 + PCIe 2.0 x4 layout of the GPU slots. All the motherboards in our review have variations on these numbers due to Flex IO, or decide to go with x8/x4/x4 PCIe layouts.
With the Z87X series from Gigabyte we also get a new visualization of the BIOS and a new version of EasyTune (hurrah!).
- We are out with the 3D BIOS which, at the beginning, suffered from sluggishness (it was admittedly getting better over time), and in with a new BIOS which allows customization. Users can fill up menus with their own options from the BIOS and then have easy access to what they need to control most (CPU settings, fan controls). Users with 1080p monitors also have a BIOS surround which gives plenty of detail about the system at hand. The older BIOS is still there (the new BIOS is essentially a skin) for users that prefer it.
- The new version of EasyTune aims for simplicity with a deep contrast ratio and a variety of options not too dissimilar from the BIOS. We get a new upgraded fan control system with internal testing of power-to-fan detection, as well as overclock options to suit almost every processor. While I initially tested a beta version of the software, it is continually being improved so expect to see better versions in the weeks after launch.
There were a couple of hiccups in the early beta BIOS I was testing with, which have all been forwarded to Gigabyte in order to be fixed in future public releases. Since then the DPC Latency, which fluctuates on the early BIOSes, is now fixed as of F5 to give 164 microseconds - also Software Update for installing system files works flawlessly, although it still does ask if you want to install Norton. One issue that Gigabyte and I are split on is whether automatic OC options should be translated in the BIOS options, and if EasyTune/BIOS should be in sync, but that ends up being a company choice. When manually overclocking, we had no issue getting to 4.6 GHz with our sample, and the automatic overclock options adjusted the memory unlike some others.
The sticking point of the UD3H is going to be that other motherboards in this review have a few exclusive features – the MSI has a Killer NIC, the ASRock has 802.11ac support, and the ASUS has Dual Intelligent Processors IV. Another kicker is that they all have an ALC1150 based audio system. In the end it comes down to the price-to-functionality ratio – the Gigabyte Z77X-UD3H is $20-$50 cheaper than the other motherboards reviewed today.
Gigabyte Z87X-UD3H Visual Inspection
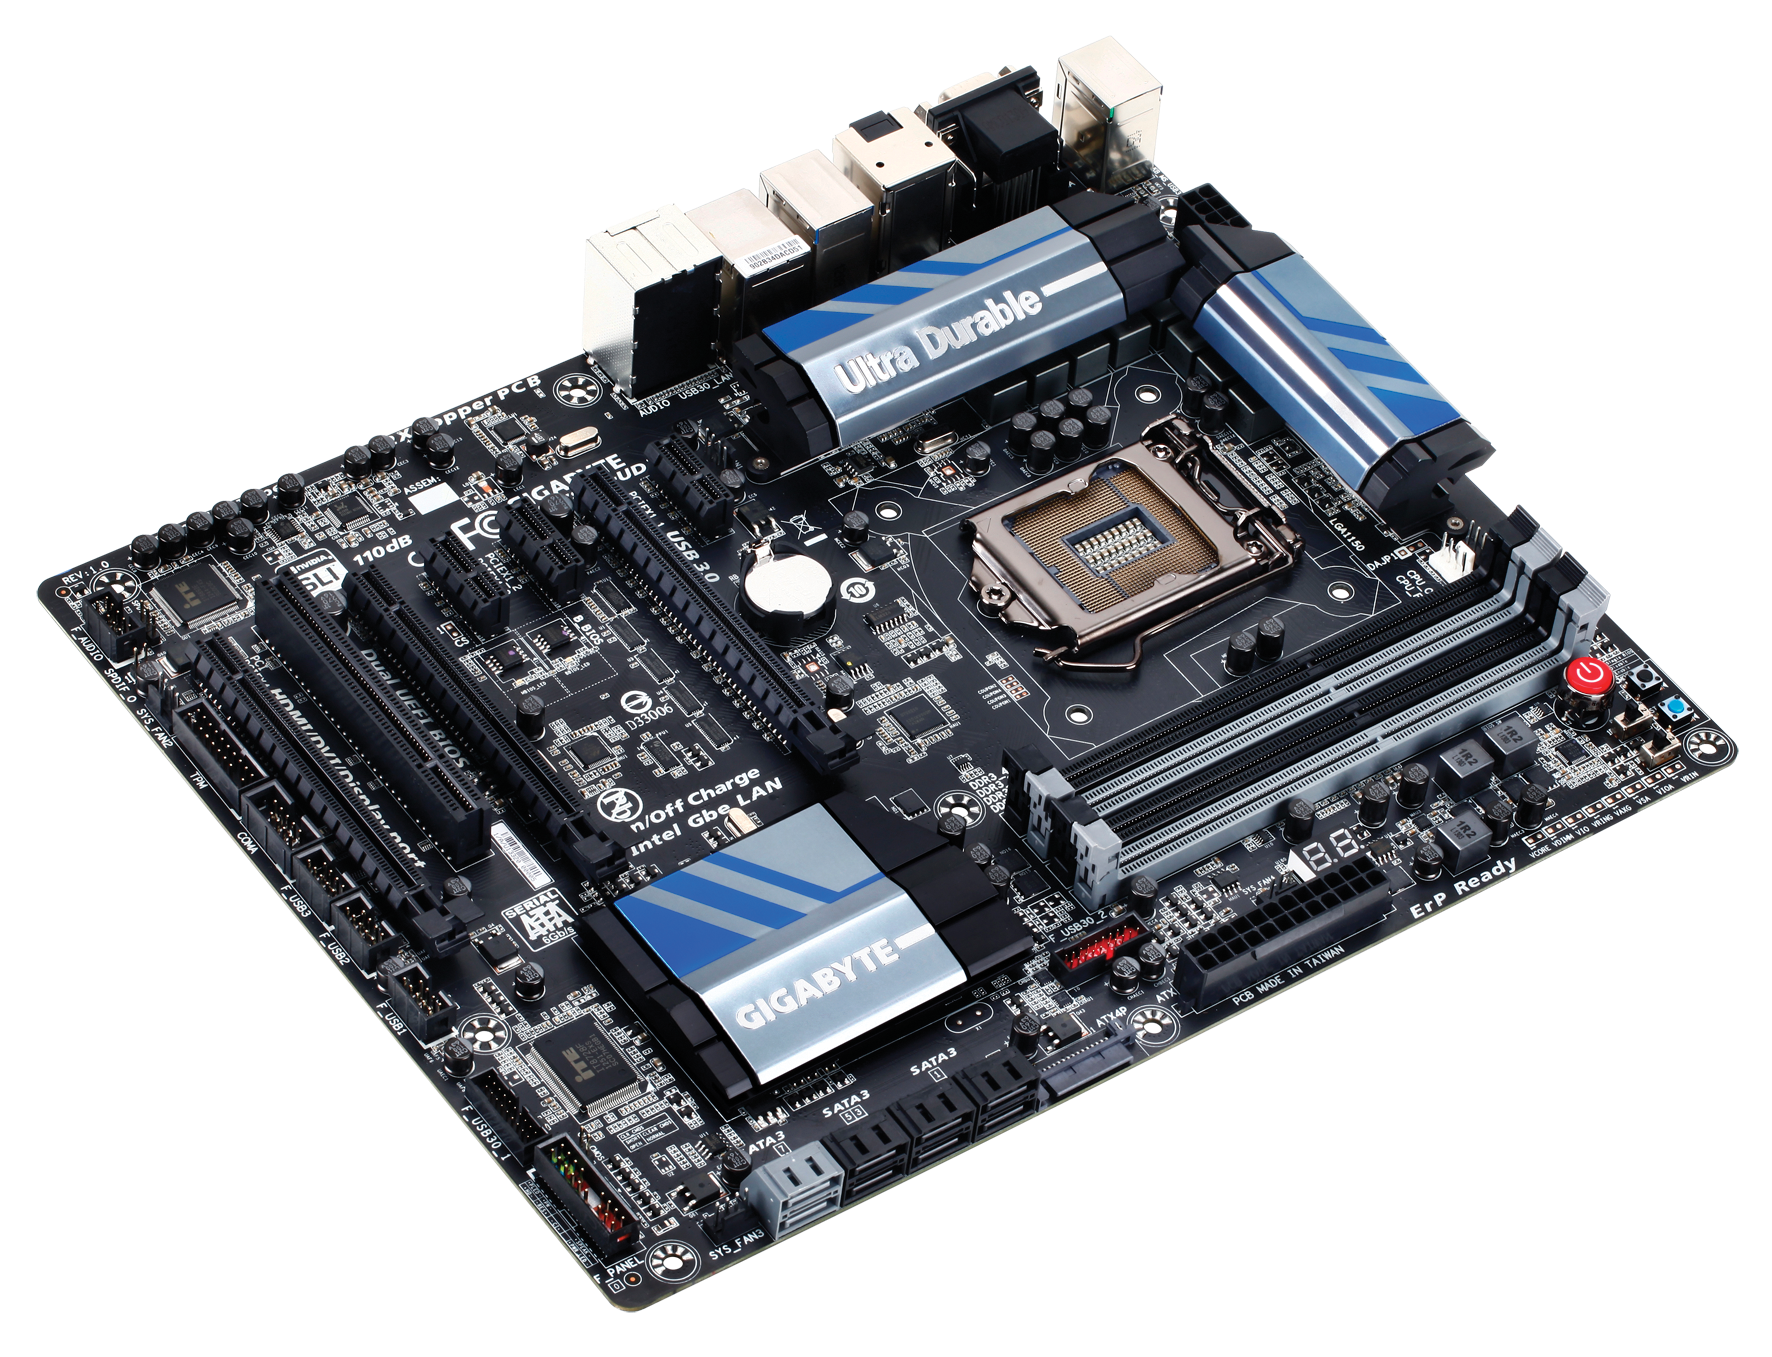
At first glance the Z87X-UD3H looks like any regular motherboard. We have slightly new Gigabyte styling compared to the Z77 range of motherboards, with the VRM heatsinks getting a small facelift and making sure that Ultra Durable is the main advertising point. Being the middle of the range motherboard, it contains all the features that for Gigabyte are must-haves (such as Dual BIOS), with room for a few extra controllers, but nothing explosive near the high end gaming or OC boards. Gigabyte is now using the 40A PowIRStage ICs for the majority of the channel range, which should offer a greater longevity with respect to the power delivery over some cheaper variants.
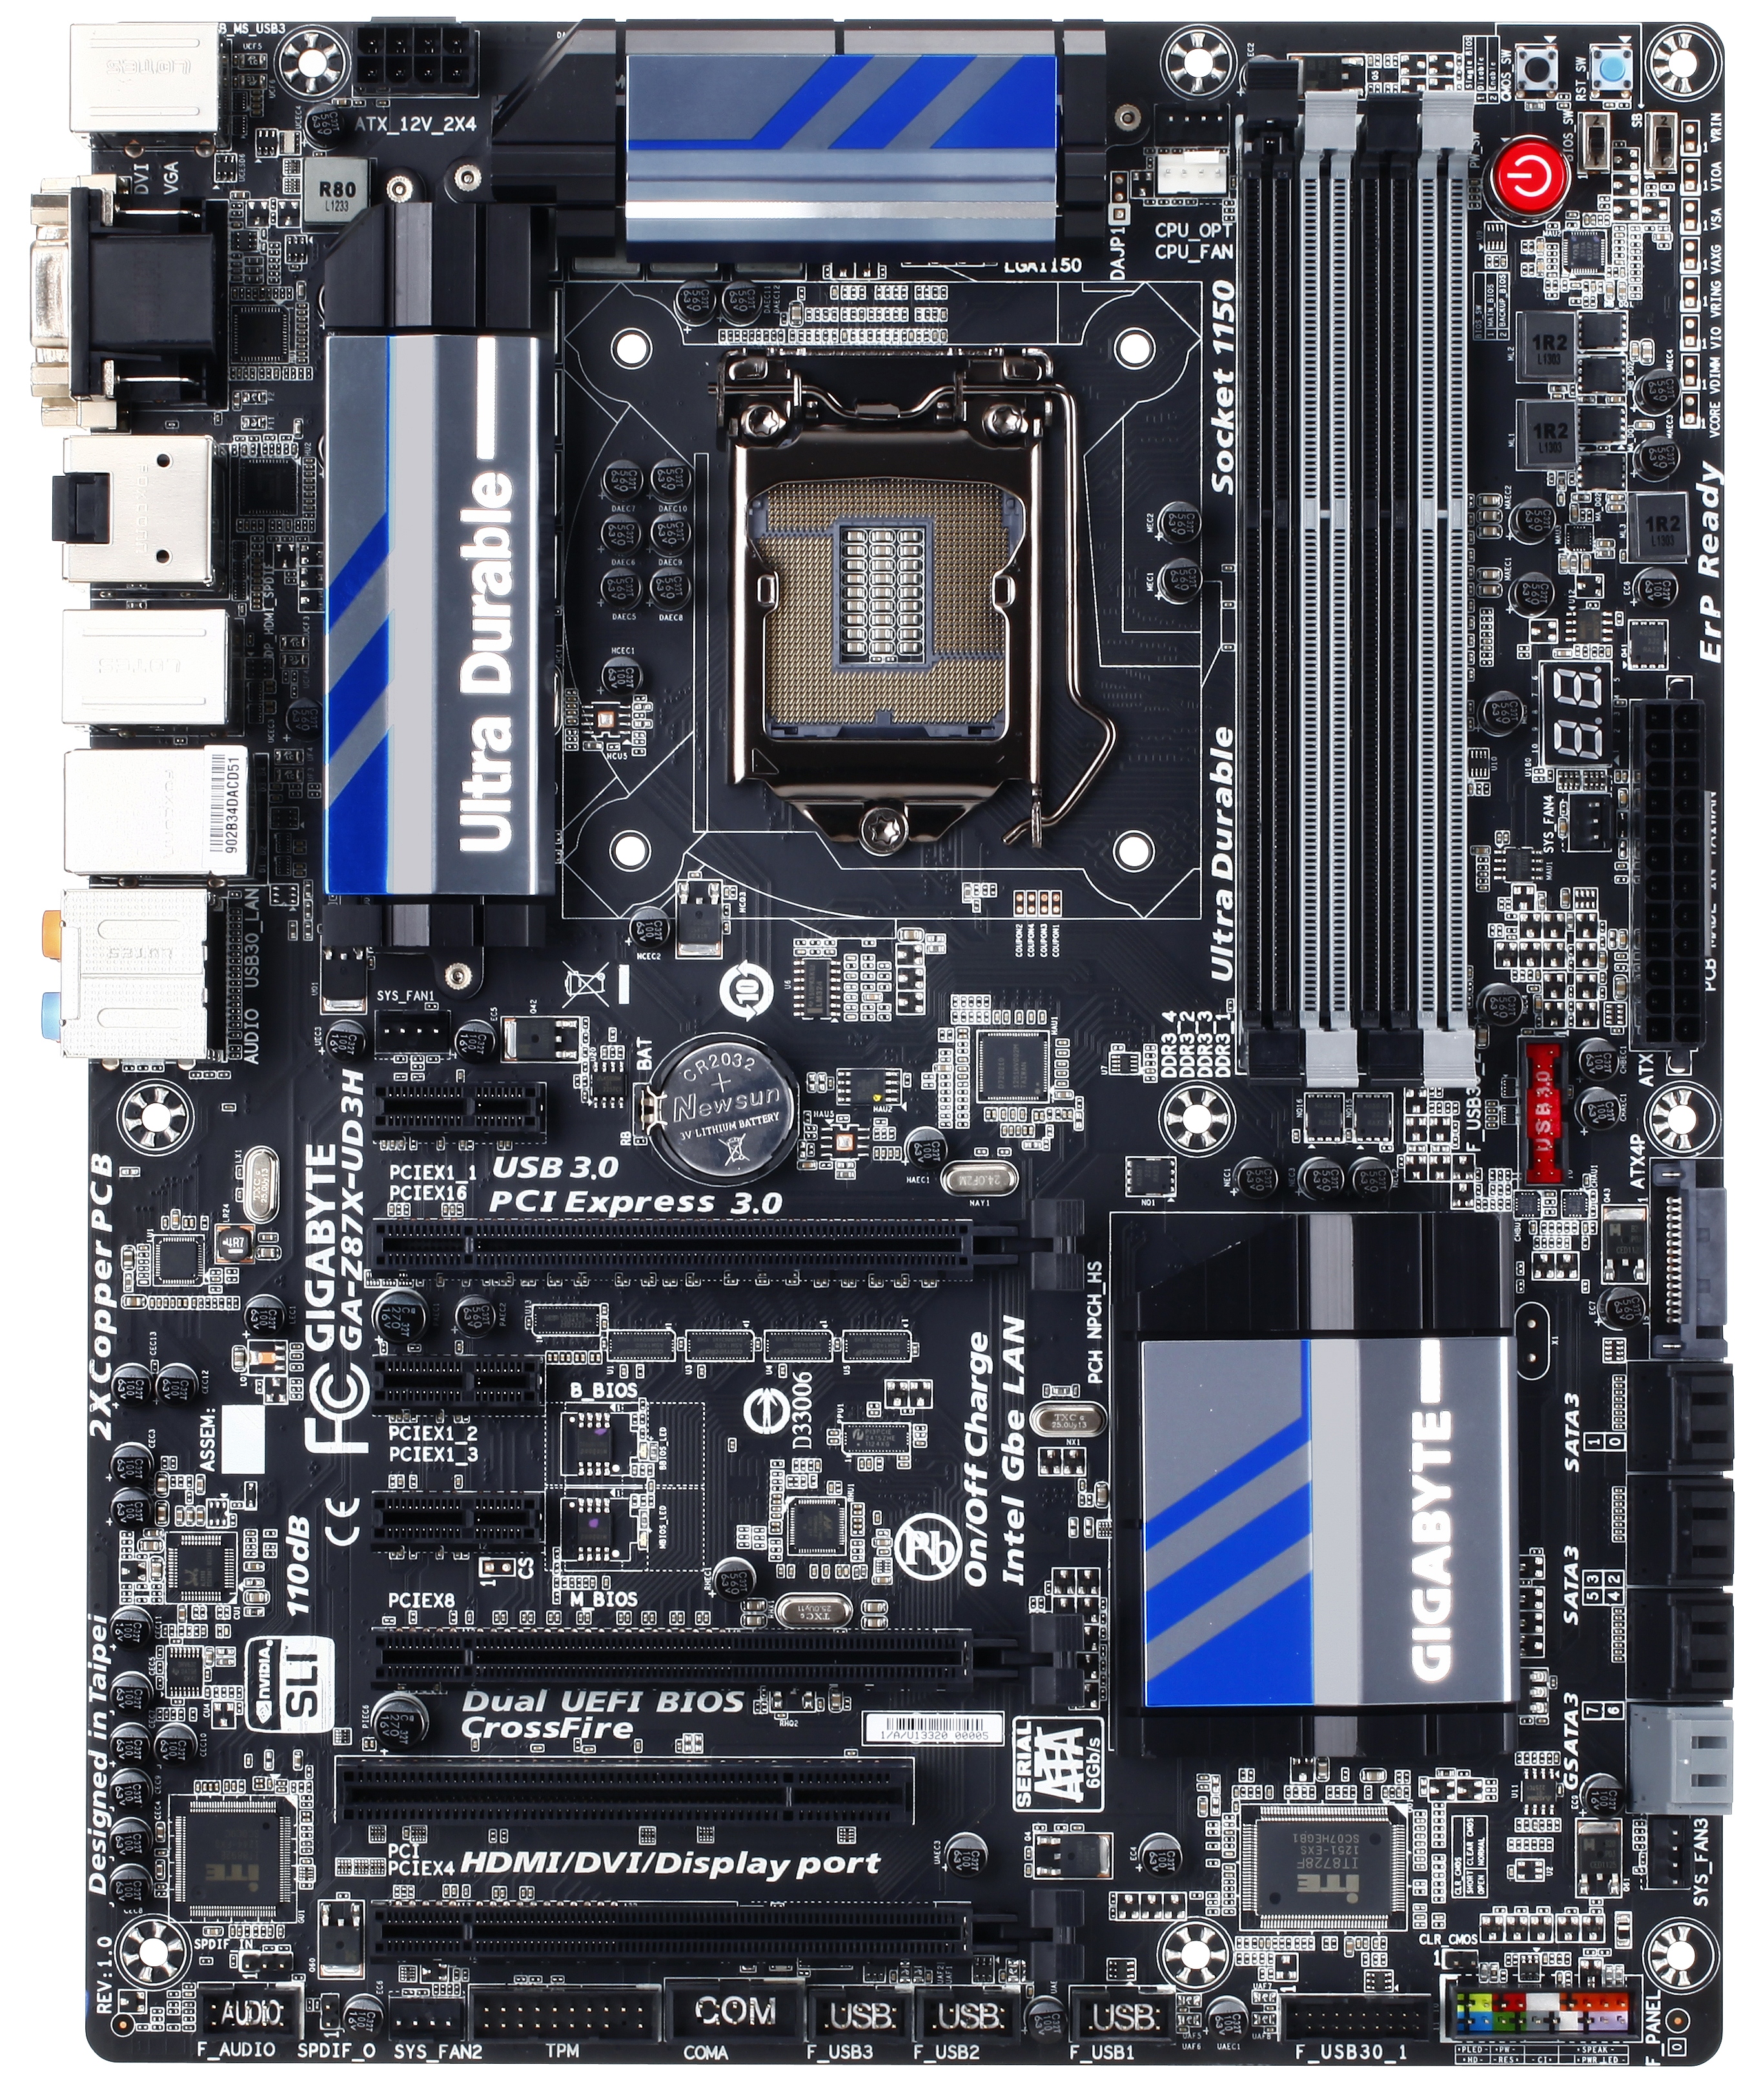
Starting with the socket area, the power delivery chokes and heatsink are right up against the Intel specification limits, as well as the memory slots, meaning that large coolers might reach over and not allow tall memory to be installed (such as G.Skill TridentX). The LGA1150 socket mechanism is exactly the same as 1155 and 1156 before it, meaning be careful when placing the CPU in and out – careful not to drop the CPU into the socket! The CPU is powered by a single 8-pin 12V CPU connector, which will be the most common type of connection in this price range. The socket area has access to four fan headers – two CPU headers to the top right of the socket, a 4-pin SYS header to the bottom left and a 3-pin SYS header next to the 24-pin ATX power connector. The other two headers on board are located under the SATA ports (SYS, 4-pin) and to the left of the TPM on the bottom of the board (SYS, 4-pin).

The DIMM slots used are double-sided latch, rather than the single-sided latch we are starting to see higher up the price range. To the top right of the DIMM slots are power/reset/Clear_CMOS buttons, all different colors and the power button is bigger to make sure you are pressing the right one. Beside these are a pair of switches for work on the DualBIOS – the one on the right tells the system to recognize either one BIOS or two (useful if one BIOS is corrupt and needs to be overwritten) and the switch on the left tells the system which BIOS to choose. It seems slightly odd given that the actual BIOS chips are in the middle of the board. Next to these switches are a set of voltage check points for users to monitor voltages themselves rather than rely on software.
Going clockwise around the board we reach the two-digit debug display, which personally I find a must on any motherboard. This is next to a fan header and the 24-pin ATX power connector. Below we have a USB 3.0 port powered by the Intel chipset, and a SATA power connector to supply extra power to the PCIe slots. Of all the variations of possible VGA power additions (4-pin molex, SATA, 6-pin PCIe), I tend to prefer the SATA power connectors just because it tends to be out of the way compared to the others.
The chipset heatsink is of a reasonable size, and next to the SATA ports: Gigabyte are using six SATA 6 Gbps from the Flex IO of the chipset and then adding in an additional SATA 6 Gbps controller for a total of eight ports. Given that Gigabyte are using four Intel USB 3.0 ports on this motherboard, this would mean the Flex IO leans to eight PCIe 2.0 from the chipset to bring the total of SATA6/USB3/PCIe2 to 6+4+8=18, the magic number.

The bottom of the board contains our usual array of front panel audio, TPM, USB 2.0 ports, and front panel headers. We also get a second Intel USB 3.0 header, as well as a COM port. The audio on the Z87X-UD3H is the Realtek ALC898, compared to most of the other motherboards in this review which use an ALC1150 derivative.
The PCIe layout on the Z87X-UD3H is one that is going to crop up time and time again on the Z87 motherboard range, with three full length PCIe slots in an x16/-/x4 or x8/x8 + x4 configuration (meaning the final four lanes are from the chipset, and are CrossFireX compatible with questionable scaling onto a third GPU). Most manufacturers not using a PLX bridge chip have a choice between the PCIe 3.0 x8/x8 + PCIe 2.0 x4 or the PCIe 3.0 x8/x4/x4, with the latter being in general better for tri-GPU gaming but will disable two-way SLI with anything in the third slot due to the x8 limitation of SLI. The Gigabyte Z87X-UD3H can do two-way SLI when a non-GPU card is in the third slot, although AMD tri-GPU scaling is not as efficient as it could be due to the PCIe 2.0 x4 – this being the tradeoff.

The rear IO of the Z87X-UD3H points to video outputs and USB 3.0. From left to right we have a PS/2 port, two USB 3.0 (controller), D-Sub, DVI-D, SPDIF output, HDMI, DisplayPort, four more USB 3.0 (controller), two eSATA 6 Gbps, Intel GbE and audio outputs.
Gigabyte Z87X-UD3H Board Features
| Gigabyte Z87X-UD3H | |||||||
| Price | Link | ||||||
| Size | ATX | ||||||
| CPU Interface | LGA-1150 | ||||||
| Chipset | Intel Z87 | ||||||
| Memory Slots |
Four DDR3 DIMM slots supporting up to 32 GB Up to Dual Channel, 1066-3000 MHz |
||||||
| Video Outputs |
D-Sub DVI-D HDMI DisplayPort |
||||||
| Onboard LAN | Intel | ||||||
| Onboard Audio | Realtek ALC898 | ||||||
| Expansion Slots |
2 x PCIe 3.0 x16 (x16/- or x8/x8) 1 x PCIe 2.0 x4 3 x PCIe 2.0 x1 1 x PCI |
||||||
| Onboard SATA/RAID |
6 x SATA 6 Gbps (PCH), RAID 0, 1, 5, 10 2 x SATA 6 Gbps (Controller), RAID 0, 1 2 x eSATA 6 Gbps (Shared PCH) |
||||||
| USB |
4 x USB 3.0 (PCH) [2 headers] 6 x USB 3.0 (Renesas) [6 rear panel] 6 x USB 2.0 (PCH) |
||||||
|
Flex IO x+y+z = 18 |
|
||||||
| Onboard |
8 x SATA 6 Gbps 2 x USB 3.0 Headers 3 x USB 2.0 Headers 6 x Fan Headers 1 x TPM Header 1 x COM Header Front Panel Header Front Panel Audio Header Power/Reset/Clear_CMOS Buttons Two Digit LED Debug Voltage Check Points |
||||||
| Power Connectors |
1 x 24-pin ATX Power 1 x 8-pin CPU Power 1 x SATA VGA Power |
||||||
| Fan Headers |
2 x CPU (4-pin) 4 x SYS (3 x 4-pin) |
||||||
| IO Panel |
1 x PS/2 Port 6 x USB 3.0 D-Sub DVI-D HDMI DisplayPort SPDIF Output 2 x eSATA 6 Gbps Intel NIC Audio Jacks |
||||||
| Warranty Period | 3 Years | ||||||
| Product Page | Link | ||||||
In terms of our 18 port Flex IO, the Z87X-UD3H splits this for six SATA 6 Gbps, four USB 3.0 and eight PCIe 2.0 lanes. In terms of controllers on the board, while we do get a healthy number of USB 3.0 ports total (ten!) and SATA 6 Gbps ports (eight!), other motherboards in our test today in a similar price bracket are using Realtek ALC1150 audio and/or an EM shield to help improve SNR and quality. Nonetheless, the ALC898 does well in our tests by comparison.


58 Comments
View All Comments
clyman - Tuesday, November 26, 2013 - link
In my personal experience and from ASUS tech support, the safest way to update bios is by first downloading it. This mobo has an excellent update program in bios that only looks at local drives, not online. I found it quite simple at each bios update.silenceisgolden - Thursday, June 27, 2013 - link
Great job Ian, really looking forward to the super high end motherboard review as well! I'm curious though, did you use the VGA port at all in any of these reviews, and also when was the last time you used a VGA port?IanCutress - Thursday, June 27, 2013 - link
My Korean 1440p panels are all via DVI-D. But the VGA comes in use when you have to use a DVI-I to VGA converter for DVI-I cables. Otherwise you need a DVI-D cable.JeBarr - Thursday, June 27, 2013 - link
Great review Ian. I very much appreciate your taking the time to explain the PCIe slot assignment and repeating the less-than-x8-no-good-for-SLI truth that needs to spread far and wide.What I took away from this review when analysing my own usage patterns and component choices is that each of the boards in this review would be better suited to the mATX form factor. There is no point in purchasing these mid-high end boards for multi-GPU, multi-display configs. There are only a handful of full size z87 boards that in my opinion earn their full-size status.
Shadowmaster625 - Thursday, June 27, 2013 - link
If it has fully integrated voltage regulators then why in blazes does it still need $20 worth of components buried beneath $3 heatsinks surrounding the cpu socket? Yeah, that's what I thought....DanNeely - Thursday, June 27, 2013 - link
What FIVR means to Intel isn't quite what you think it means. What's on package is the collection of VRs needed to provide power to all the separate sections of the CPU and to vary them as the chip clocks itself up and down. The motherboard itself still needs to do the heavy lifting to convert the 12V from the PSU to the voltage used by the DRAM and to a single input voltage the that CPU converts to the other levels it uses internally (IIRC this is the full load core voltage).I believe the reason why those regulators can be squeezed into the package while the ones still on the mobo are much larger is that the uncore/cache have relatively low power levels and the lower core voltages are only used at low CPU loads and thus don't need to push nearly as high of a peak current level.
WeaselITB - Thursday, June 27, 2013 - link
Wonderful review, Ian. Any chance of a Z87 vs Z77 vs ... comparison chart? It seems like functionalities of the processor are highly publicized, and the individual motherboard reviews chart the differences between chipset models within that family, but I don't recall seeing a comparison between chipset families. I know the chipset seems to be taking a smaller and smaller role these days, but it would still be helpful to exactly see the differences between generations.Thanks!
Kougar - Thursday, June 27, 2013 - link
It doesn't work with my 30" U3011 monitor either, yet another forum user with the same monitor didn't have any problem. Only difference was he used a Radeon and I use a GTX 480.
Creig - Thursday, June 27, 2013 - link
I only had time so far to skim this article, so I apologize if this question was already answered in the body. Is there any way to find out when each board starts shipping with the C2 stepping of the Z87 chipset? As some people are already aware, the C1 stepping has been shown to have issues with certain USB 3.0 controllers disconnecting when the computer awakes from sleep mode. The C2 stepping is apparently already shipping to manufacturers, but it would be handy to know a way to ensure that a person who orders a board in the near future receives the updated chipset.blackie333 - Friday, June 28, 2013 - link
I'm not sure that C2 stepping shipping already started, according to public available plan from May only samples have been sent to manufacturers. Mass production of C2 should start on 1st of July and manufacturers should start receiving them from the 30th of July. Boards based on C2 stepping should be available for end users from middle August.But you maybe have some more actual/insider information.