Gigabyte Z77X-UP7 Review: OC Oriented Orange Overkill
by Ian Cutress on March 1, 2013 10:30 AM EST- Posted in
- Motherboards
- Intel
- Gigabyte
- Z77
Gigabyte Z77X-UP7 In The Box
When spending $400 on a motherboard, even one aimed at a specific niche such as extreme overclockers, box contents are a vital part of the package to woo the user. As mentioned previously in the review, the Z77X-UP7 feels like an upgraded G1.Sniper 3, so I would not be too surprised if we see similar contents in the box. My hope for these themed packages is that something part of the package holds up to that theme, such as the ASRock Z77 OC Formula that comes with standoffs and an OC Formula labeled carry bag.
In our Gigabyte Z77X-UP7 package, we get:
Driver CD
WiFi Card CD
Motherboard Manual
WiFi Card Manual
Rear IO Shield
Dual slot Rigid 4-way SLI Bridge
Dual slot Rigid 3-way SLI Bridge
Quad slot flexi SLI Bridge
Quad slot flexi CrossFireX Bridge
GC-WB300D Dual Band 2x2 WiFi PCIe x1 Card supporting 802.11 a/b/g/n and Bluetooth 4.0
Dual Antenna for GC-WB300D
Eight SATA Cables
USB 3.0 Front Panel
eSATA Rear Panel with Molex Connectivity
Voltage Point Connectors
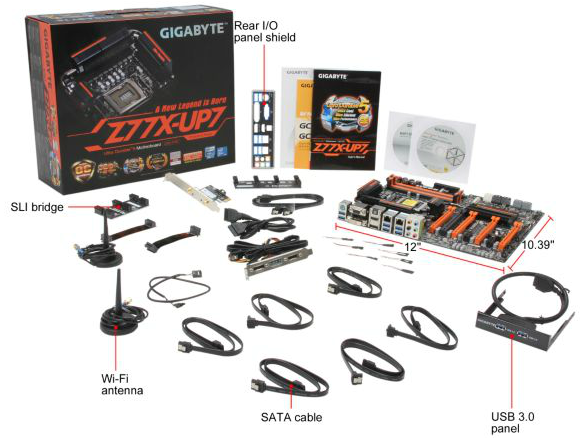
I am struggling to think of a package with this much kit included. Admittedly users wanting 4-way GPU action will have to forgo the WiFi card (as well as have a tight squeeze on the connectors at the bottom of the board). Overclockers will not care much about most of the package – the multi-GPU connectors and voltage point connectors being the priority here, but no doubt the inclusion of stand-offs (like the OC Formula) would have been appreciated. The only thing really missing is that essence of exclusivity – nothing in the package is solely specific to the UP7. Sometimes in motherboard packages we get posters or something similar, but no so here.
Gigabyte Z77X-UP7 Overclocking
Note: Ivy Bridge does not overclock like Sandy Bridge. For a detailed report on the effect of voltage on Ivy Bridge (and thus temperatures and power draw), please read Undervolting and Overclocking on Ivy Bridge.
Experience with Gigabyte Z77X-UP7
Overclocking on Gigabyte boards is a distinct mix when it comes to automatic and manual options. All the automatic overclock options are in the OS using EasyTune6, offering three different levels of fixed overclock and an automatic tuning option. Most users will head to the BIOS for manual overclocking outside of ET6 or GBTL, which as mentioned in the BIOS section of this review is an odd mish-mash of options around the place rather than menus focusing in on all the options of one particular element of overclocking. GBTL is a great little tool for extreme overclockers to eek out the last few MHz while in the OS.
For automatic overclocks, all of our options worked fine, although the Level 3 settings were extremely loose causing high temperatures due to voltage. The automatic tuning option did not fare too well, resulting in a mid range overclock that failed a memory test.
Manual overclocking was straight forward enough, although at every CPU speed we seemed to be one notch on the voltage higher than other boards. Temperatures were content up to 4.9 GHz on our setup as well.
For memory, our system did XMP on a 2x4 GB G.Skill DDR3-2666 11-13-13 1.65 V kit wonderfully, but failed to boot our memory kit with a simple notch up on the memory strap (2800 11-13-13) which both the ASRock Z77 OC Formula and MSI Z77 MPower did without issues. For kits in this range, it is advised to head over to this thread at HWBot to ask Gigabyte’s in house overclocker regarding what sub-timings should be changed. In terms of BCLK, our board rose to 109.6 MHz.
Methodology:
Our standard overclocking methodology is as follows. We select the automatic overclock options and test for stability with PovRay and OCCT to simulate high-end workloads. These stability tests aim to catch any immediate causes for memory or CPU errors.
For manual overclocks, based on the information gathered from previous testing, starts off at a nominal voltage and CPU multiplier, and the multiplier is increased until the stability tests are failed. The CPU voltage is increased gradually until the stability tests are passed, and the process repeated until the motherboard reduces the multiplier automatically (due to safety protocol) or the CPU temperature reaches a stupidly high level (100ºC+).
Automatic Overclock:
For automatic overclocking we used QuickBoost in EasyTune 6:
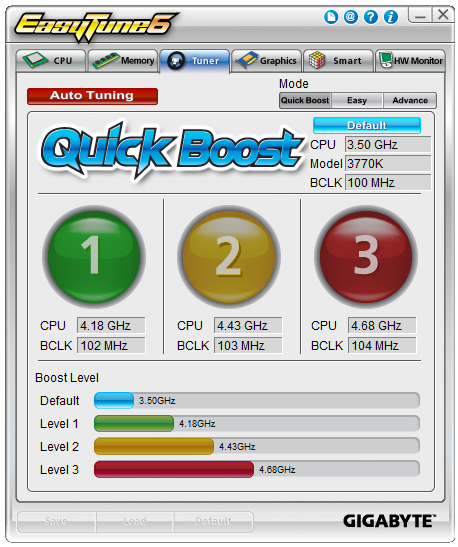
QuickBoost offers three levels of overclock and an auto tuning option. Our results were:
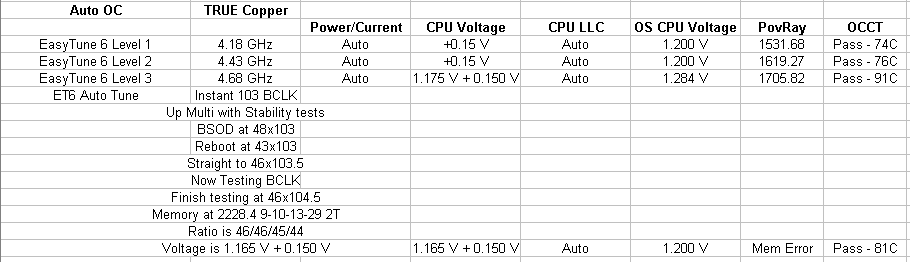
All three ET6 options were stable in our overclock testing, although the 4.68 GHz setting reached 91C during OCCT on an open test bed. The Auto Tuning option did its usual thing of going raising BCLK/Multiplier with stress testing, and finished with a staggered overclock (46x/46x/45x/44x) based on load with a CPU load voltage of 1.200 volts. This passed our CPU stress test (81C max) but failed our memory test.
Manual Overclock:
For the manual overclock testing, our usual procedure is to test the stock values, then dive in at 4.4 GHz at 1.100 volts as set in the BIOS. Based on previous overclocking scenarios, the following options were chosen throughout:
Power Limit: 500W
Current Limit: 300A
CPU Load Line Calibration: Turbo
If the settings were stable as per our testing, the multiplier is raised. If the settings fail, the voltage is raised by 0.025 V in the BIOS and tested again. Here are our results:
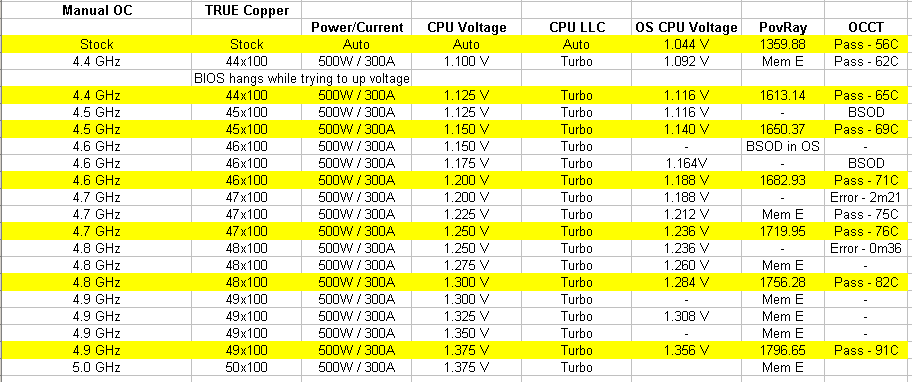
Compared to most of our Z77 testing, the UP7 does a good job - we hit 4.9 GHz within temperature limits, and 4.8 GHz with ease.


41 Comments
View All Comments
Drasca - Saturday, May 4, 2013 - link
I am really getting annoyed at the insufficient documentation on PCI-E slot configurations being enabled/disabled. It makes testing a lot more difficult. Just tried orange slots 1 and 2, thinking they'd work. Nope. Tried a single card in slot 2 orange. Nope. It is likely disabled on default. There is no mention of this in the very short multi language manual Gigabyte provides. I've tried the Asus Maximus V Extreme a few weeks ago, and while I didn't know about it-- at least the thing provided a configuration card and table documented in the depths of its manual. No such documentation is provided by Gigabyte.Time to try population all slots at once.