NZXT Switch 810: When Too Much Isn't Enough
by Dustin Sklavos on February 1, 2012 7:00 AM EST- Posted in
- Cases/Cooling/PSUs
- NZXT
- Full-Tower
- Switch
Assembling the NZXT Switch 810
Thankfully, putting together a system inside the NZXT Switch 810 is fairly simple and run-of-the-mill. It's a sizable case, but at 20 pounds it isn't woefully unwieldy either. I was disappointed to see the motherboard standoffs weren't pre-installed. This is a little thing and only takes a minute or two, but it's a courtesy some of the other case manufacturers include and I wish NZXT had as well. Popping the I/O shield in was a little more difficult than usual, but that's due to how malformed it is from having been inserted into and removed from twenty cases. Actually installing the board was fine, though, as was wiring everything up.


Installing the drives was easy, too. The bezel for the 5.25" bay pops off without any hassle, and then from there you can slide the optical drive in, lock it into place, then pop the bezel back on. I was impressed at how well the button on the bezel lined up with the drive. Our 3.5" drive pops into a toolless drive tray, but I'm not a huge fan of NZXT's trays: they're flexible in the wrong ways, can be difficult to actually remove, and the pins don't go in as easily as I'd like. Getting our 1TB Western Digital drive in took a bit of force. Thankfully, the 2.5" drive goes in the same way they always do (mounted to the bottom of the drive tray with four screws), but here also lies a problem: the connectors on the back of the drive don't line up with the 3.5" drive above it. Instead, the 2.5" drive is recessed due to how it mounts on the tray. Cabling one while 3.5" drives are installed around it may be a minor nuisance.
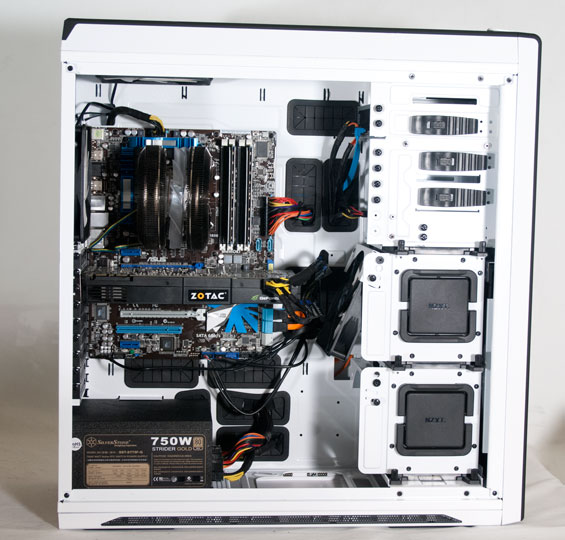
Finally, installing the video card and power supply was as easy as you'd expect with a full-tower case, and our GTX 580 offered plenty of clearance for the directional internal fan mounted to the drive bay behind it.
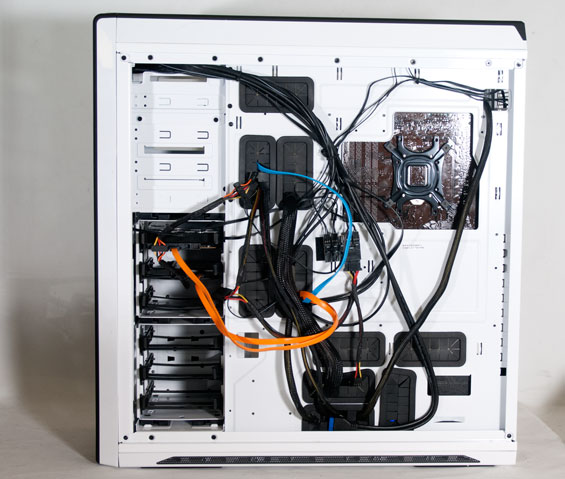
Cabling things was also easy, but it should be mentioned that many of the modular cables we use with our SilverStone power supply were stretched close to their limits. NZXT includes an extension cable for the AUX 12V line (and with all that headroom above the motherboard that line has never been easier to connect), but be forewarned that if you go with the Switch 810 you may need some extensions depending on your power supply.
Our build wound up being reasonably clean, and while I would've appreciated maybe an extra millimeter or two of space behind the motherboard tray, there's still a reasonable enough amount. The side panels didn't require any real pressure to replace. Basically, so far so good: the case is easy to build in and feature rich. So how does it perform?


29 Comments
View All Comments
erple2 - Wednesday, February 1, 2012 - link
I have a bottom mounted PSU and really like that it cleans the interior of the case without cluttering a bunch of cables inside the case. Then again, I don't have a PSU with a bottom mounted fan - it's a rear mounted one instead.BTW, Bottom mounted freezers make more sense than a top mounted ones for at least 2 reasons:
1. Cold air sinks - put the part of the device that's supposed to be colder on the bottom
2. I use the Fridge part quite a bit more than the freezer part - so put that part more at my level.
The_Countess - Thursday, March 22, 2012 - link
they do that so you have room at the top to install a 420mm radiator.besides, there is a (easily removable) dust filter in front of the intake fan, if you mount the PSU with the fan facing downwards, which you dont have too.
earthrace57 - Saturday, May 5, 2012 - link
Actually, I put mine upside down....so the fan is pointing up (corsair 400R)1. Usually cold air flows into that area because of the intake fans, with only the GPU and PSU to suck it up
2. My PSU's fan very very very rarely turns on, so the natural process of heat rising is a good thing
adece - Wednesday, February 1, 2012 - link
My question is this: If the fan directed to the GPU was not contributing to better cooling, did you tried the old horizontal airflow? If it was better that you could have just said that the feature looks nice but it is ultimately useless. That's my only concern with this review. Otherwise it's as good as any of the other ones.Hella-D - Wednesday, February 1, 2012 - link
Id Rather Have A Bunch Of Quiet But High CFM Fans Running At Full-Tilt. In My Opinion Fan Controllers And Just Fan Speed Adjustment In General is Pointless, At-Least I Know My Fans Are Alwayse Pushing High Amounts Of Air And Keeping My Hardware Cool, Even My Graphics Card I Have Set To A Constant 80% Fan Speed (Highest It Will Allow For Some Reason)And Noise, Eh, I Like To be Able To Hear My Fans As-Long As They Arent Too Loud And Especially Whiny That Way I Know They Are Indeed Working.
BlueReason - Thursday, February 2, 2012 - link
1. Yes bottom mounting the PSU hurts cooling of every other component in the case by interfering with airflow coming from front and potentially bottom mounted intakes. However, top mounting the PSU with the intake on the inside of the case is just as stupid, because then it's getting both dust AND hot air (unless you think the other dust filters on your case are somehow magically better than a psu dust filter, or that dust can't fly?), and disrupting a fluid current of air to the cpu.That said, don't put your bottom mounted PSU-case on carpet, or on a dirt floor. Consider placement when choosing a case. Shouldn't have to tell you this.
It astounds me that so few case designers have realized the least stupid answer to the PSU-placement question is just to put a damn psu intake vent ON TOP OF THE CASE. Some have done this. Not enough.
2. Concerning our guest of the day, the Switch 810: Like every Anandtech case review, all it tells us is how their component setup performs in the case. If the In-Win Buc thermally matching the Silverstone FT-02 doesn't cause you to read the test results of every Anandtech case review with a giant vat of salt, I don't know what to tell ya.
3. Golly what a surprise: slanting the fan so that it directed incoming air away from the place on the GPU that actually would utilize that air...ugh, folks.
4. No surprise that an NZXT case is better in photos than it is in use. The same goes for Coolermaster and their chincey crap. NZXT is more disappointing because unlike Coolermaster their designs actually seem inspired, only to be sabotaged by weak engineering and cheap manufacturing.
cjs150 - Friday, February 3, 2012 - link
What I dislike about case designers is how lazy they are. Stick a fancy front on and some tool-less drive cages and they think that is it.Not sure case design has moved forward in 5-10 years.
I agree, pick a case where the PSU placing works for you. But is it about time case designers followed Lian Li and Silverstone lead and experimented with different PSU placements.
But my pet hate at moment is graphic cards and the placement of the power connectors - absolutely no thought as to how that would work for decent cable management.
here are a few thoughts for case designers:
1. Hard drives placement and cable management. How about having a drive cage where all drive plug into a daughterboard (bit like some of the hot swap boards) so only one power connector needed, and all SATA Data goes through same board and out at a convenient point for connection to main computer motherboard.
2. More room round back of motherboard (see Fractal Arc Midi) for cable management.
3. Dampening around optical drive bay.
4. All side panels to have rubberised strips where metal meets metal to stop any resonance
5. Improved front panel cable management -every case I have ever had seems to either have cables that are too long or too short
6. Makes cases wider (seeing this already) allows for larger fans.
7. NEVER EVER release a case without all intake fans having washable dust covers
8. Give up on stealth covers from optical drives - never works for long
zlandar - Friday, February 3, 2012 - link
After owning a CM sniper and Corsair 500R I would never buy another gaming case without one. Especially at the price range of this case where it's something I would expect.Only quibble I have with the review is the use of a tower cooler instead of using a water-cooler. Mounting a water cooler at the top of the case with fans blowing out would lower the temps inside the case and improve GPU cooling. The reviewer commented one of the major benefits of the case is custom watercooling; why not check the temps and noise with that setup?
fluxtatic - Saturday, February 4, 2012 - link
Maybe too many variables - Push-pull? or Push-only? What rad(s)? What blocks? As bit-tech (IIRC) pointed out, it's very difficult to have meaningful w/c results, as there are ridiculous variations in the hardware. In air-cooling, standardize on a well-performing (ie, tested on a bench) tower cooler and stock fan config, and away you go. You can cram a 360 in this case, but what if it will only take a 240? And on and on. Maybe if they did these rounds of testing, and one more using a H100 or so, replacing the rear fan mount with the stock rad/fan configuration from the H100...but that really only tells you how the H100 does. Which you already know, having seen the multitudes of reviews when it was released.Lateral mount PSUs don't make sense to me (never having seen one) - what about the rocker switch and cable jack? Well, whatever - next couple I build will be low-powered enough to use PicoPSUs, so no worries about any of this silliness :)