Sandy Bridge-E and X79 – The ASUS P9X79 PRO Review
by Ian Cutress on November 14, 2011 3:01 AM EST- Posted in
- Motherboards
- Asus
- X79
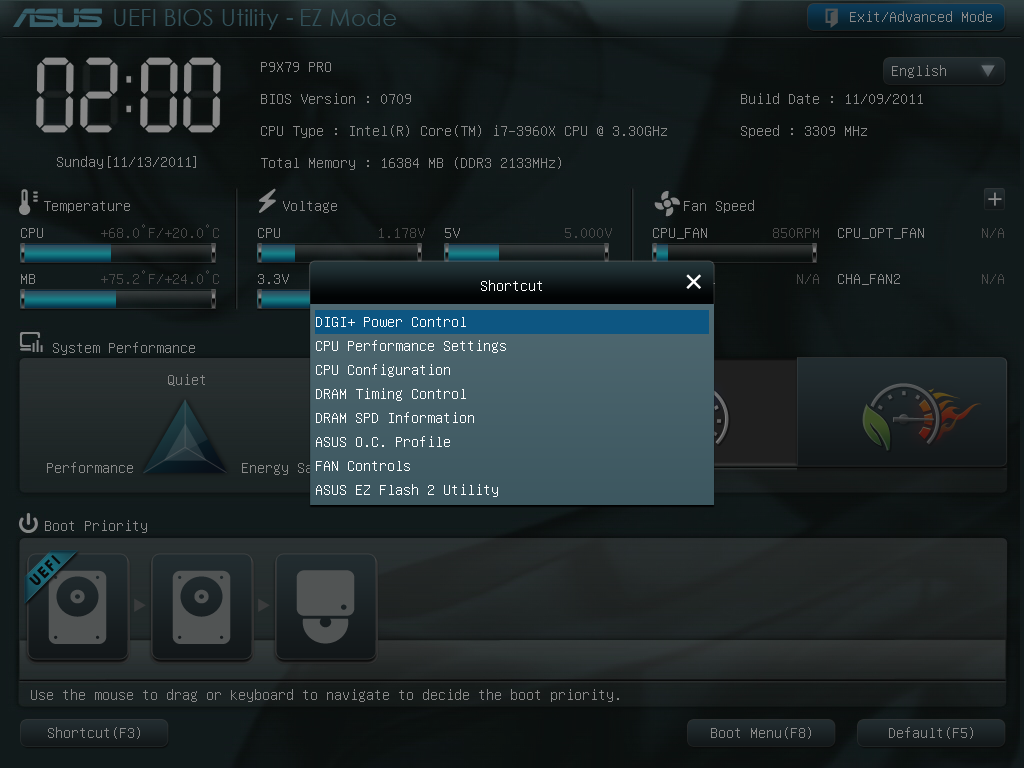
Over the past year, ASUS have built a solid graphical UEFI interface which, personally as a reviewer, covers almost everything I want in a BIOS. Rather than break something that works, ASUS have worked a little on the implementation for X79 to improve the functionality. The main change here is the shortcut menu, found by pressing F3. Rather than requiring the user to navigate through menus and deciding what is a deeper menu or not, the most frequently used options in the BIOS are listed and are now only a click away. As a long time BIOS user, I do not find much need for this – I am fairly adept at navigating through the BIOS via keyboard at speed. However, for just wanting to flash a new BIOS (I always prefer doing it in the BIOS itself), I found it quite useful.
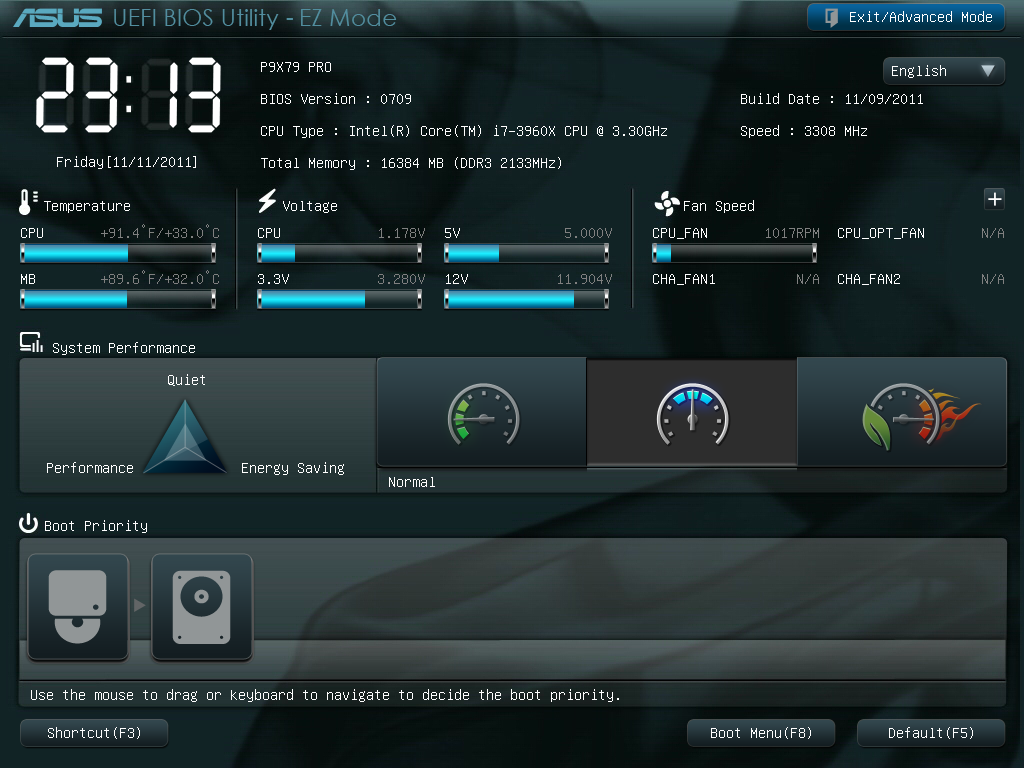
However, the user starts off in EZ mode – a simple to use screen full of information that any user or admin would want. For a start, telling us what board we are using, the processor, detected memory and speeds, CPU temperatures, voltages, fan speeds and the boot order is something every vendor should show on the front screen. ASUS has implemented this spot on. From this page, a user will be able to tell if memory is not detected, select an overall ‘faster’ or ‘greener’ mode, or arrange the boot order.
Inside the advanced mode, we have a more vintage feel of the BIOS options. Almost all the options here are selectable in a variety of ways – mouse and submenu, keyboard and submenu, or in the case of values, keyboard and typing. As a keyboard/typist sort of BIOS user, I feel frustrated when in an attempt to go graphical a motherboard manufacturer will force you to sift through a list going from 0.8 V to 1.65 V in the memory in 0.0075 V increments. There are no such problems here in ASUS’ implementation.
AI Tweaker modes come in Auto, Normal or XMP, which allows the user to define BCLK frequencies to the nearest 0.1 MHz, the CPU Strap (1.00x, 1.25x, 1.66x or 2.50x), target CPU ratios for per core usage, and the memory strap. Sub menus provide DRAM timings, where ASUS provide a seemingly endless level of detail on what users can select for their memory, control over the DIGI+ power delivery (also available in the OS), and a variety of CPU performance settings. Voltage adjustment is available underneath this, where most voltages are simple value selections, but the CPU voltage is also available in offset mode.
By pressing F5, the BIOS will revert to Intel defaults on all these values, but by pressing F6, the BIOS will default to ASUS values, which offer a change in performance. Personally, the only change I was able to discern is that this turned per core turbo ratios off, and put the i7-3960X (6C/12T, 3.3 GHz, 3.9 GHz Turbo) into a full turbo mode on any core operation. Actually, whenever I changed any part of the BIOS, this occurred. By changing any DRAM or memory timings/ratios, or setting XMP, or changing the BCLK/multiplier, rather than the CPU go into a normal mode (39x/39x/37x/37x/36x/36x ratios on 1/2/3/4/5/6 core usage), it implemented the max turbo for any CPU usage. This put a little spanner in the works regarding our benchmark suite, which as I will mention on the test setup page, I adapted the operation to standard.
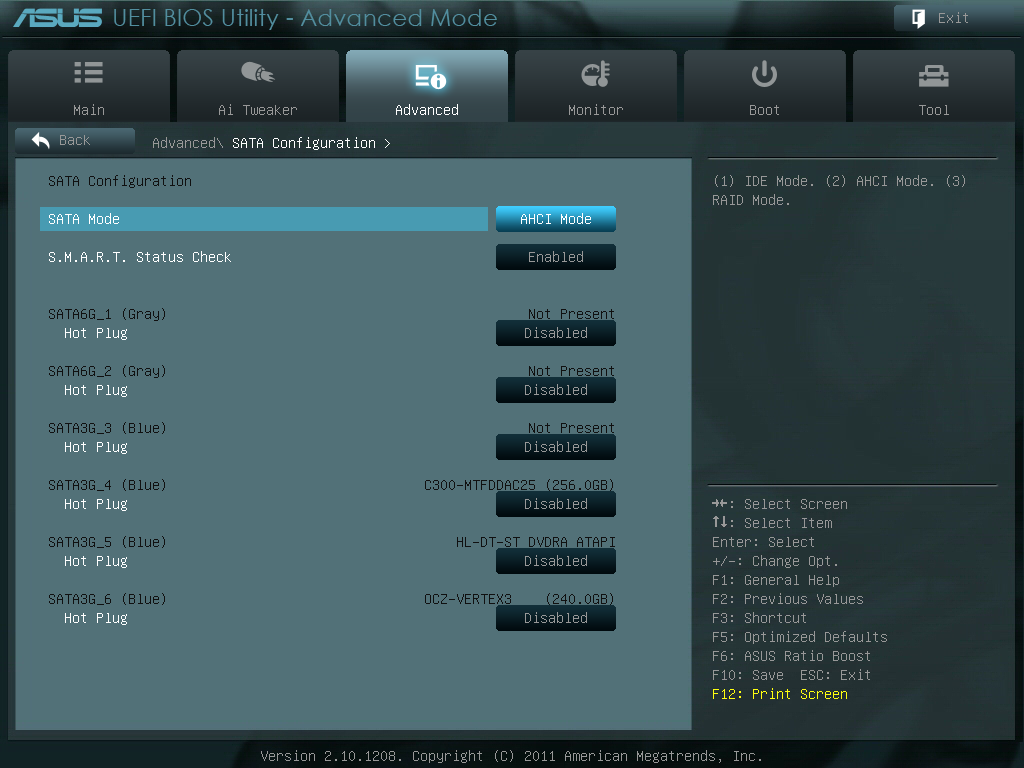
One feature I have been pushing motherboard manufacturers on for Sandy Bridge is that AHCI mode is enabled be default. So far, as much as I can tell, only ASUS on their high end products have done this. So with X79, this is the time to make the change – which ASUS have done on their Pro board, which is not their high end board. Hopefully, when looking at some of the other vendors’ implementations, they have done likewise.
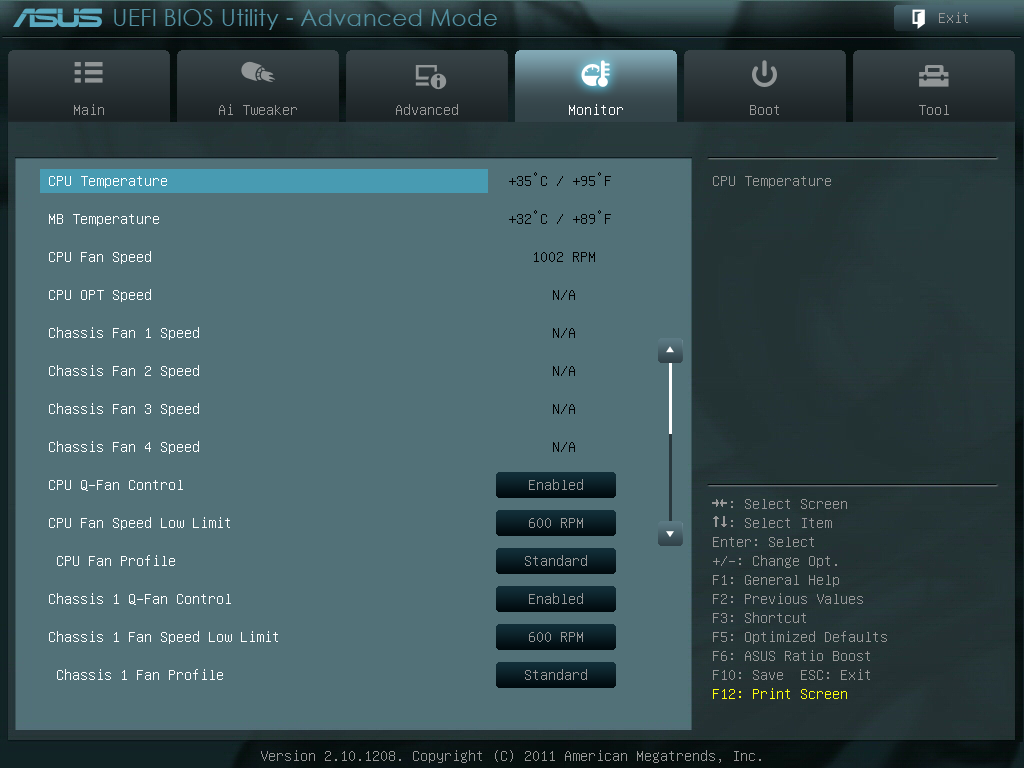
Under the Monitor heading are the BIOS fan controls, which allow almost full control over the fans (the OS software is better adapted to this). All four chassis fan headers are controllable individually, and the two CPU fan headers act under the same control.


Overclocking on X79
The realm of overclocking has changed in recent months, especially in the hands of Intel. If we take the previous enthusiast platform, X58 and LGA 1366, a full array of BCLK and multiplier adjustments were available. Personally, I moved from that platform (and my trusty i7-920 D0) to P67 and Sandy Bridge, where due to the clock generator arrangement, I had access to the multiplier and perhaps +/- 2-5 MHz on the BCLK. In terms of the joy of overclocking, this was a bit of a let down – but Intel has (sort of) met in the middle with X79.
On a basic level, we have a standard clock generator pumping out 100 MHz. This is split several ways, most notably one way to the CPU and memory through a buffer chip, and one way to everything else. Using this buffer chip, we can select four gears/ratios: 1.00x, 1.25x, 1.66x and 2.50x. As a result, we can send 100 MHz, 125 MHz, 166 MHz and 250 MHz to the CPU/memory, while restricting everything else to 100 MHz. The basic 100 MHz, like P67/Z68, can be adjusted – usually by +/- 2-5 MHz as Sandy Bridge was able. On top of all this, we also have multiplier adjustment.
With this in mind, I can already tell you that the majority of overclocks from system builders will be on the 1.25x ratio. It provides a simple 25% overclock if the multipliers are not changed, and providing they are using Intel’s all-in-one liquid cooling as a minimum (or a high end air cooler), temperatures should not be an issue. No doubt we will see motherboards that implement this as a one-button option on the motherboard – ASUS’ auto overclock option does something similar. In order to push the memory, users may opt for the 1.25x ratio, and then decrease the multiplier to a reasonable temperature level.
In terms of the ASUS’ board performance, I first had a go at the auto OC options.
Auto OC
ASUS offers a ‘Fast’ and an ‘Extreme’ mode in their software options. ‘OC Tuner’ in the BIOS, and activating the TPU switch on board, both default to the Fast mode. In this fast mode, we see a jump to the 1.25x CPU ratio, and a slight increase in the BCLK with a multiplier adjustment. Instantly, this equates to a 34x multiplier with a 126.4 MHz BCLK, giving 4296 MHz, which hits 68ºC in Cinebench (20ºC ambient max).
In Extreme mode, ASUS uses a series of algorithms and stress tests to determine the maximum frequency. Usually, I am underwhelmed by this option in my previous reviews, providing no real insight into the depth of the CPU. Despite this, the Extreme mode did run tests, BSOD and eventually reach a final speed without any intervention. A simple 35x multiplier and 127.9 MHz BCLK (4476 MHz) is good enhancement over the Fast auto OC option. However, it may worry some people that the CPU registered an 88ºC temperature when stress tested.
Manual OC
In terms of manual adjustment, my main focus here was the multiplier. Booting at 45x, with auto voltages and the CPU fan/pump set at 100%, the board was stable. However, it was pulling 1.496 V at load, resulting in 90ºC under full OCCT stress – far too hot for my liking, and this is outside a case! But setting the voltage manually to 1.4 V, the board still booted happily at 45x, giving only 82ºC under stress. The board would boot at 46x, but was unstable at 47x.
At the 46x multiplier, at 1.4 V, with load line calibration at auto, the CPU would hit 82ºC under OCCT or Blender Stress, and only 73ºC for the 3DPM multithreaded (3DPM-MT) benchmark. At this speed (4.6 GHz, 6 cores, 12 threads), our 3DPM-MT gave a score of 1145.66, up from 914.76 at stock.
Memory
Of note with this BIOS (0709), is that when I populated the memory slots with 4x4GB DDR3, the board would default to the nearest JEDEC speed timings of the kit to 1600 MHz – in this case, my G.Skill kit has a JEDEC of 1676 MHz at 11-11-11, so the board defaulted to 1600 11-11-11. When I selected 1866 MHz memory, it shifted to 9-9-9, disregarding JEDEC vales.
The XMP profile was easy enough to enable with the XMP mode. For more performance, I pushed the board on to the 2400 MHz strap, which booted at auto values of 10-11-10 2T, and was completely stable. Moving towards the 2666 MHz strap caused failed boots. The nearest strap while on the 1.25x ratio was only at 2333 MHz, suggesting that 2400 MHz on the 1.00x strap is a safe memory overclock.


55 Comments
View All Comments
OblivionLord - Monday, November 14, 2011 - link
Better question... why use a dual 5850 setup to test a dual 16x pci-e 2.0 when you could have done a dual 5990 or better yet dual 590 or 6990? The main benefit with this release is to answer the lack of pci-e lanes which if you had highend cards, your only option was x58 until this release since dual 8x just wouldn't cut it on a dual 590 or dual 6990 solution.Also when running those cards in sli/crossfire, lets see how stressed the 4 core sb is vs the new 6 core or even nehalem or westmere.
Beenthere - Monday, November 14, 2011 - link
No disrespect to Asus but there's no way in Hell I'd pay $300 for any desktop mobo no matter how many "features" it has.In addition the X79 chipset with more RAM channels is a waste for anything but server use, which is not what this mobo/platform is being hyped for. As other website reviewers have noted, the X79 mobos are basically hacked server mobos being hyped as an enthusiast desktop upgrade, which it really is not.
With the price of the mobo and CPUs, Sandy Bridge-E and X79 are a fail as far as many if not most enthusiasts are concerned. Basically this is a rushed-to-market product that doesn't fit well in either the enthusiast or server segments. That's why many folks are saying: PASS just as they are with "Ultrabooks" that ain't Ultra at all except in price - just like this deal.
This deal looks like an opportunistic cash cow that may die quickly?
Mikuni - Monday, November 14, 2011 - link
Why anand never mentions in ASUS reviews about the long standing memory leak present in their AI suite? atkexComSvc grows up to a few GB after just a few days, this is totally unacceptable and should be made aware in every post and review about ASUS until they fix it.ASUSTechMKT - Wednesday, November 16, 2011 - link
Feel free to send me information i continually use this application and have not seen this issue. It is a possibility an attached driver or system could be causing the issue. Regardless we are interested into looking into it if there is an issue.
vol7ron - Monday, November 14, 2011 - link
Ian,I'm curious how this would fair for computational games like Starcraft II, which relies less on video rendering in FPS and more on model layouts.
Thx
mdzcpa1 - Monday, November 14, 2011 - link
I'm concerned to see the review says there is no long crossfire cable included. Obviously anyone wanting to run crossfire on this board and have the X16 X16 slots is going to need a long CF cable. Is it possible the reviewer is incorrect and the long ribbon cable is for CF?ASUSTechMKT - Wednesday, November 16, 2011 - link
The extended cable is SLI. As AMD cards include crosshair cables it is up to the vendor you purchase from to opt in those cables. On our triple slot cards we do offer a extended length cable. Regardless this is good feeback i will pass along to HQ but it is also another cost aspect to consider. As most of the dual GPU market uses SLI it was a decision made on that factor.On a secondary note we do have availible for pruchase extended crossfire bridges from our estore.
bradcollins - Tuesday, November 15, 2011 - link
Do your X79 boards support Xeon E5 series cpu's? I have a pair of E5-2670's here and I am trying to choose between the Gigabyte X79-UD5 and your P9X79 Deluxe. Because you have taken fan speed control seriously, I will most likely get the P9X79 Deluxe, but would like to know if it will support my cpu.Beenthere - Tuesday, November 15, 2011 - link
No disrespect but what's the big deal with fan control? I've been building high end PCs for 20 years and never had any issues with fan speed control.bradcollins - Tuesday, November 15, 2011 - link
There has never been a board that has automatically done what I want it todo, until now by the looks of that picture in this article. I want my pc to be silent during normal operation and don't care too much about the noise when I'm playing games. At the moment the loudest thing in my PC which is an i7 975EE at 3.73ghz is the hard drives, and I want my SB-E system to be just as quiet. With an E5-2670 at (hopefully) around 4.2ghz or so I am worried about how loud it will be.Ohh and by the way Asustechmkt, I did read this from an earlier post, but you don't specifically say if the other boards will boot or what will happen: "Our P9X79 WS is qualified to support Xeon series CPUs. Other baords may potentially offer microcode support but will not be officially validated for use with Xeon CPUs. "