Lian Li PC-TU200: On the Road With Lian Li
by Dustin Sklavos on October 31, 2011 12:45 AM EST- Posted in
- Cases/Cooling/PSUs
- Mini ITX
- Lian Li
In and Around the Lian Li PC-TU200
If you've been keeping up with my case reviews since I started hammering them out a few months ago, you'll know I'm a proponent of enclosure designs that find newer, sometimes smarter ways to work. At the very least, I can respect any company that's willing to tinker with conventions and experiment with their designs: that's why I have such a soft spot for SilverStone, and it's why I'm developing one for Lian Li. But there's a major difference between the two: SilverStone experiments a bit with their designs, but Lian Li oftentimes seems like their engineers have started entirely off the grid to begin with.


Externally, the TU200 seems pretty self-explanatory. The front features a single 5.25" drive bay with a bay cover so as not to mar Lian Li's trademark all-aluminum design. Below it are the power button and reset buttons, followed by the massive front vent for the 140mm intake fan. Making sure to keep with the times, the bottom of the enclosure sports an eSATA port and a pair of USB 3.0 ports, along with the standard headphone and mic jacks. The corners of the enclosure are covered in molded aluminum bumpers while the top has a handle built into it, not so quietly suggesting that the TU200 is meant to spend its time on the road instead of buried under your desk.
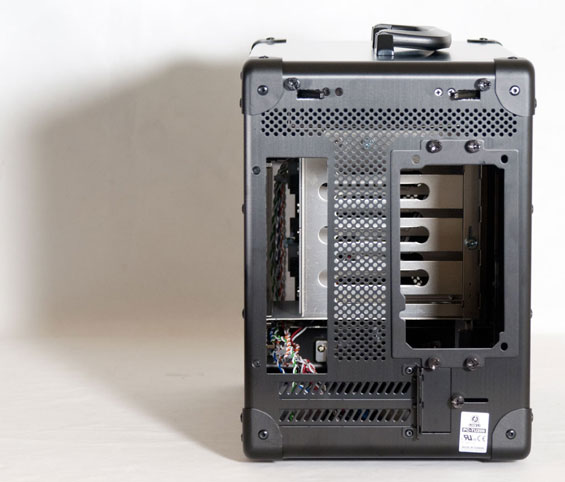
Pop over to the back, and you'll notice two major clues that all is not normal in Lian Li's world: two levers at the top, locked into place with thumbscrews, that are designed to pop out the side panels. Below them is a healthy amount of ventilation, the power supply mounting plate, and the openings for the motherboard I/O cluster along with two ventilated expansion bay covers.
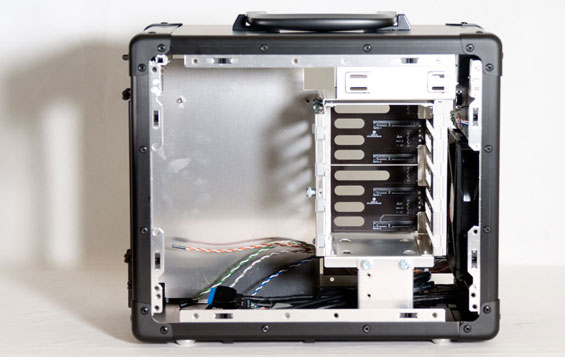
When you do open up the TU200, everything is where you'd expect it to be...sort of. There's a fairly healthy sized drive cage to the right able to support four 3.5" drives (or three 3.5" drives and a single 2.5" drive that mounts to the bottom); that cage is held in place by the top cage for the 5.25" drive and a small plate that secures into both the cage and the bottom of the enclosure with thumbscrews. If it wasn't clear from the outside that quarters in the TU200 were going to be cramped, it should be abundantly clear now. Thankfully the standoffs for the motherboard are built into the tray.
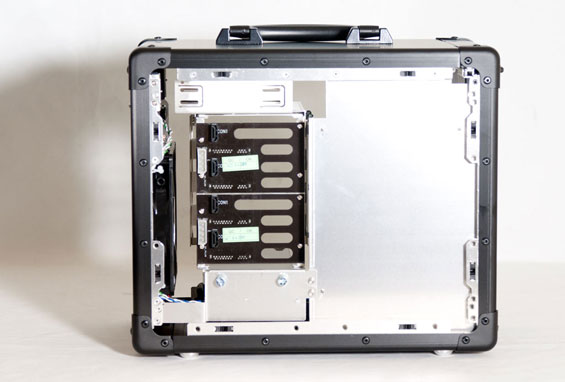
Speaking of the motherboard tray, you'll notice that behind it there's virtually no gap between it and the side panel; any cable organization has to be done behind the drive cage backplane. And while that backplane is very much appreciated, it has a couple of minor flaws. The first is that Lian Li inexplicably includes molex power connectors instead of SATA power. I've mentioned this before: molex needs to go the way of the dinosaur, period. The second has to do with the mount at the bottom of the cage used for the 2.5" drive: it just doesn't line up with the bottom connectors. Given that Lian Li has to use custom grommets and screws to mount a 2.5" drive to the bottom of the cage anyhow, I feel like some allowance could or should've been made for this.
Quarters in the TU200 are pretty freaking cramped. That's to be expected from an enclosure this small and designed with these parts in mind. While the front intake fan theoretically provides airflow for the entire system, it also can potentially run into trouble from the drive cage blocking the air, and it's too high to bring in cool air for the video card; for that there's ventilation in the bottom of the case, but as you can see in the photos the TU200's feet don't lift it off the ground very much. On carpet this gap will be completely closed.


53 Comments
View All Comments
TheGoodGeek - Friday, November 4, 2011 - link
For reference, the clearances in this case are:VGA Card length: 300mm
PSU length: 140mm
CPU cooler height: 80mm
TheGoodGeek - Friday, November 4, 2011 - link
I've posted complete details of my build in this case along with photos and hardware choices (both wrong and right), on my blog (TheGoodGeek dot Net). A bit too long to post here, but the highlights are: don't go with a stock ATX PSU, get one of the shorter SFF ATX PSUs, and don't throw more wattage at it than you really need. 850W is overkill and will add to heat issues. Definitely find a better quality low profile CPU cooler, not the Intel stock cooler. I prefer the Asus P8H67-I to the Zotac Z68. Maybe Anand has had better luck with their Zotacs than the rest of us, but I just wouldn't trust it. Be willing to adjust your initial build until you get the cooling performance you need. Since my post ~5.5 hours ago, temps have only risen to: 30C CPU, 32C motherboard.JonnyDough - Sunday, November 6, 2011 - link
I'd like to see a slim laptop drive bay instead of a 5.25". No cover is necessary, as that just ads weight and extra wear on my drive gears.I'd also like to see an included or available SOLID 375-550w standard PICO or ATX PSUs with SHORT wiring. Cohort with a brand name we recognize (some companies, ie Silverstone manufacture both cases and PSUs that are of quality, so pay attention if you do).
Another note goes to durability. The black looks nice, but the painted corners will likely soon show wear as the paint comes off. If you use paint, make sure its very durable powder coating. Non-gloss (flat) is just fine. Plain stainless steel edges would do well also. The use of a heavy and thick (so you can barely see through) stainless steel mesh for air intakes or the case sides altogether (like the kind used for customized grills on automobiles) would be superb. I think you could slap together a pretty mean case. I would be willing to fork over more money for something that I know will last me 10 years and a hundred(s) of LAN parties.
Wiring is a big pain when it comes to small cases. as well as getting access to components like hard drives, disc drives, ram, CPU heatsinks. Make it so the PSU and drive bay swings out of the way if you can so that the motherboard is openly accessed. I want everything to fold out on a swivel somehow so I can reach in and replace the motherboard easily.
getback2us - Friday, November 11, 2011 - link
I like the Chenbro ES34069 specs the most.For the given size and 4 x 3.5 slots with a slot for DVD player sounds perfect to me.
A 5.25 bay is essential in many cases when you are trying to dump contents from DVD to NAS. Doing it USB 3 or gigabit port might be another option, but what couldn't be more efficient than a local DVD drive.
The Lien Li PC-Q08 and PC-TU200 are 2 best NAS cases I found next to Chenbro ES34069.
There is 2 another good ones. One by Fractal design and Silverstone SST-TJ08 are 2 close matches for LOTSs 3.5 and at least one 5.25 drives while still being Mini-Itx and compact.
I am always on lookout for compact BIIGG capacity cases.
if anyone knows more, please let me know
cyberkost - Saturday, November 19, 2011 - link
Pros:space for 4 3.5" HDD -- I grew to like RAID10 with 4 HDD
5.25" bay -- full spectrum of ODDs can be used + a host of other 5.25" devices
ATX PSU -- again, easy to find / less expensive parts
Screw-less side panels -- open the case up easily for airflow or temporary hook-ups
Mobo tray -- mobo is NOT on a side panel!!
Compact size / mobility
Cons:
Aluminum feet -- going to scratch / mark the surface the case is standing on
Price -- a bit too high (should be same / similar to PC-Q08 ~ USD120-130)
Silver front fan bracket in a black case -- visible through, not very aesthetic (can be painted, but I'd much prefer anodized from the factory)
Placement / orientation of front panel buttons / connectors -- I think Lian Li should have arranged them in a vertical cluster like on PC-Q08 .. or at least have USB3.0 and eSATA ports oriented horizontally
Neutrals:
Handle .. but it kinda goes with that "luggage" corner design
cyberkost - Monday, December 26, 2011 - link
More of a question: did anyone try to put another intake fan on the bottom using rubber screws? I think it might work / be helpful in the no GPU scenario ...TheGoodGeek - Monday, December 26, 2011 - link
No. There's not enough room with a GPU installed, and I think there are better SFF choices if you're going the no GPU route.n13L5 - Sunday, August 26, 2012 - link
The TU200 case reviewed here is a 25.3 liter case, with:300mm graphics card clearance, which is good, but only 140mm PSU clearance and a pretty poor 80mm CPU cooler clearance.
.
The smaller PC-Q08 at only 21.3 liters does better:
300mm graphics card clearance, 160mm PSU clearance, and a not perfect, but much better 110mm CPU cooler clearance.
.
What this means is, that you'll be hard pressed to install anything better than Scythe's Big Shuriken cooler in the TU200.
The PC-Q08 can hold a far better Noctua NH-L12 (with 2x 120mm NF-P12 fans) or even a Noctua NH-C14 cooler (with 1x 140mm NF-P14 fan).
Looking at some comparison tests made a strong point for using the NH-C14 cooler: With 2 fans installed, it beats a lot of massive top-end tower coolers and with only 1 fan installed, its still beats some, and it certainly beats anything that fits into small cases.
The Big Shuriken is great for its size at only 58mm high, but it lacks fin surface area to compete when you have 110mm to play with. Result, you get much better cooling in the PC-Q08 than in the TU200. I could not find anything better than the Big Shuriken that still stayed under 80mm height. (if you know something, I'm interested, please let me know)
Economically, the Noctua NH-C14 cooler is also interesting, even though its not cheap: the second fan it comes with won't fit on the cooler in this case, but it can be used as a case fan in the PC-Q08 in two places, and its an expensive, very high quality, silent fan.
The cooler costs 65 Euro with those 2 fans, which separately cost 21 Euro each. So, with the extra, I have to buy just one more 140mm fan to complete the cooling, setting me back 86 Euro total.
If I buy the Big Shuriken instead, it costs me only 42 Euro with its one slimline fan, but I still have to buy 2 140mm case fans, so I would end up with an almost identical 84 Euro total.
Granted, if you don't mind buying cheaper/lower quality fans, this calculation falls apart :)
.
.
Note: the PC-Q08 spec lists one 140mm fan and one 120mm fan, but like many other 140mm fans, Noctua's 140mm fans have 120mm mounting holes and there's enough room around the 120mm cutout in the case to mount them in both locations. Actually, the 140mm cutout in the case could hold a 180mm fan, if you can find a good one, which I found surprisingly difficult...
n13L5 - Friday, September 7, 2012 - link
I largely agree with the reviewer's criticisms but not with some of the proposed solutions.Right up front: the much cheaper (and same size) PC-Q08 is much better thermally, due to a smaller simple drive cage with more perforations, and an additional 120mm exhaust fan at the top, and the greater clearance for CPU coolers of 110mm instead of 80mm on the PC-TU200.
The TU200 drive cage is a major selling point for me, cause once the case is built (only thing that really annoyed me is cable management) drives slide in and out, and they do hot swap.
I've built this with 2012 components: Asus P8Z77-i Deluxe, Intel I7-3770K, Gigabyte GTX 670 OC Windforce, one SSD and one HDD and CL8 Crucial RAM.
Issues:
1) Drive cage should be much more perforated and moved 1/2 inch toward the front fan.
2) Annoying that modular 160mm deep PSUs are unsuitable for this case and 140mm PSUs are generally not available with modular wiring. Antec does make a great 140mm deep PSU series for this case though, the EarthWatt Platinum 450/550/650 Watt at 93% efficiency.
3) Using the Asus mainboard with its vertical power management daughter board makes it impossible to fit a Scythe Big Shuriken, which would otherwise be a good fit for this case. I'm using the awful Intel stock cooler till I find something with a 120mm fan that fits.
4) Related to this, due to no 120mm exaust fan anywhere, a little liquid cooler with radiator is out of the question for CPU cooling too.
5) While the entire floor of the PC-Q08 is perforated for GPU air intake, only the rear section of the TU200 is perforated. If you have a reference board cooler design, your GPU's fan is going to sit 1" from solid metal, cutting its efficiency.
6) Making the case slightly longer, like Dustin recommended may also give enough room for a 120mm exhaust fan behind the handle, so yeah... also, the case wastes some space in height, so the increase in length could be accompanied by a decrease in height. Though I do like that the current form factor makes it look like a guitar amp.
7) Due to the thermal limitations, my setup is much louder in this case than in the PC-Q08. During a stresstest (running Furmark simultaneously with Cinebench R11.5) pushing GPU and CPU to full load, Intel's retarded CPU cooler was howling, followed by a BOD after about 15 minutes. This was no problem in the PC-Q08, it didn't even get noisy.
Lest you think I'm trying really hard to sell you on the PC-Q08, that also has some annoyances: The sides only come off by unscrewing 16(!) screws total, and there is no mainboard tray, the mainboard standoffs are on the right side outer panel. Given how wide that case is, I guess it was about cost cutting, seeing how this case is about half the price of the TU200. But given the TU200's issues, it does make the PC-Q08 look good, even though its drive case is nothing special.
I missed bidding in time on an SG08 on ebay, so I have to wait for another one before I can test that, cause I'm not paying Silverstone 200 Euros for their steel case with a non modular bronze PSU.
n13L5 - Friday, September 7, 2012 - link
Forgot to mention the 2.5" drive issue:With all the little custom parts Lian Li made for the TU200, they could have easily provided a mounting bracket for 2.5" drives that would let them slide & plug right into the backplane.
As it is, you have to mount rubber grommets to the bottom instead of the sides, and then try to fish SATA power connectors through the small openings in the backplane, for which I popped off a cover from the connector to get it through, and after installation, your wires are stressed over sharp edges.
Overall, I'd call the TU200 the case of stressed wires...