Rosewill Thor v2: The God of Cooling and Silence?
by Dustin Sklavos on August 24, 2011 2:15 AM EST- Posted in
- Cases/Cooling/PSUs
- Full-Tower
- Rosewill
Assembling the Rosewill Thor v2
Do you remember when I said the Rosewill Thor v2's internals reminded me of the insides of Corsair's cases? That's a good thing and a compliment: Corsair's cases are still the easiest ones to build in I've ever seen, and thankfully the Thor v2 was just as easy to work with.
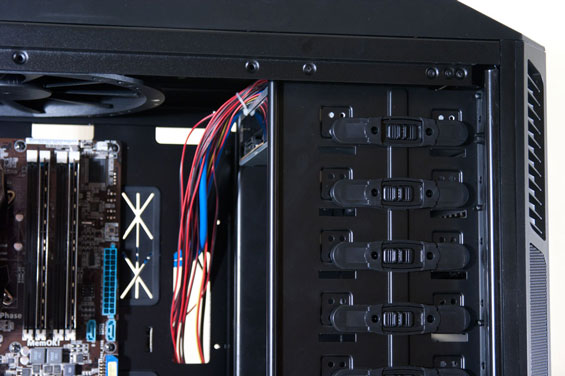
Installing the motherboard was easy and painless, though Rosewill doesn't include stand-offs built straight into the board, a convenience I do miss. Where Rosewill does run afoul of Corsair is in the rubber grommets used to line the holes in the motherboard tray, which as I said before are held in largely by wishful thinking. Honestly they're just not strong enough to stay in and for most of my cable routing I wound up either accidentally or deliberately popping them out, and this was going on pretty much from the get go.
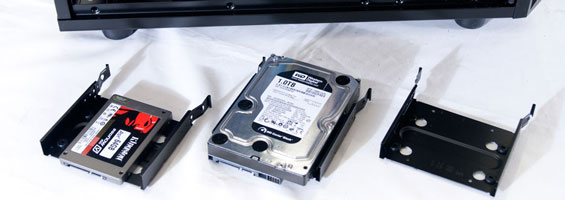
Unfortunately, while the drive trays are still back-facing and thus awesome, they aren't tool-less. The trays support both 2.5" and 3.5" drives, though only the 3.5" drives use rubber standoffs to dampen vibration (presumably anyone using 2.5" drives would have SSDs), and drives are always mounted from the bottom instead of the sides. Still, the trays work well enough and routing the cables behind them was a breeze.
The same can't be said for the tool-less mechanism Rosewill uses for installing 5.25" drives. To remove the bay covers, you actually slide the right part of the case's front bezel off and then lever out the covers. Honestly, the old school "squeeze-and-pop" bay shields would've been perfectly fine here. My main problem is that the tool-less mechanism used to lock the drives into place is flimsy and loose. Optical drives are often among the loudest components in a good build, and with very little really securing them, they're free to vibrate in the bay. I would have been happier with just openings for screwing them in, and thankfully, you can forego using the case's locks and just use screws to mount them.
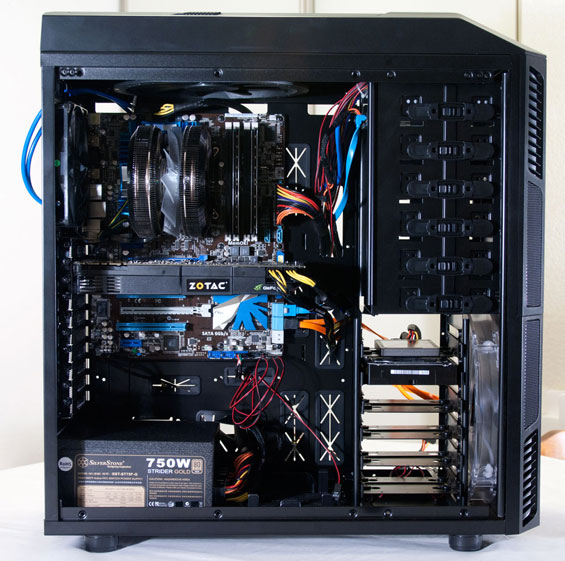
Getting the power supply in and everything else wired up was delightfully painless, as you'd expect from a chassis this size. While the case's cables are a mess of tiny wires, they're ultimately still fairly easy to actually sift through, and there's plenty of space behind the motherboard tray to keep the installation clean. The only issue I really ran into was routing the USB 3.0 cables out the back of the case: the rubber grommets in the back are just as loose as the ones inside, and shoving the cables through them invariably caused them to pop out. You'll also have to route a fan controller cable to the inside so you can connect the side intake fan, something you'll definitely want to do.


All told my chief complaints remain the iffy build quality. The rubber grommets are no big deal (NZXT's H2 had the same problem), but just about everything about the 5.25" drive bays rubbed me the wrong way. They aren't a huge issue and you can work around the problems, but even the material that lines the inside of the bay shields to filter dust is barely held in place. The fan controllers in my first review unit were also problematic: if I didn't tape the knob down, eventually fan speed would just ramp back up to full. I don't want to have to choose between having a tower that runs silent and cool with a piece of shipping tape on the top of it or a tower that runs very cool but with some noise, and I shouldn't have to. Judging from reviews on NewEgg, though, my problem seems to be isolated.


35 Comments
View All Comments
black44dog - Friday, September 7, 2012 - link
I know this is an old article.. But i wanted to let everyone know the updates this Case has gotten since the article has been written.I just put together my Rosewill Thor v2 case with these parts:
Asus Sabertooth Z77 mobo
Intel Core i5 3570k
g-skill 16mb ram x2 8gig chips
CM Hyper Evo 212 CPU Cooler
LG Blu-ray burner
OCZ Vertex 4 128gig SSD
EVGA GeForce GTX660 TI 2GB
I purchased the case for 103.99 on newegg last week. It was on sale for 129.99 plus had a 20% off promo code.
The USB 3.0 pass through no longer exists. They replaced it with an ACTUAL USB3.0 Connector to the motherboard header. HUGE upgrade there..
The grommets are still flaky.. not a big deal.
Everything fit perfectly and looks amazing with the Sabertooth's Thermal Armor.
Hope this helps others looking into reviews for this case.
Horrabin - Saturday, January 12, 2013 - link
with the original V2 I've had for close to a year has been entirely positive. I consider this to be the best case I've ever used for a build in its price range (and one or two more "upscale" in the past). I really like all the the ports for cable management (aside from the grommets, as has been mentioned). I have 2 graphics cards, 6 HD, a DVD burner, a card reader, and an add-on 3.5 USB3 front panel that came with my motherboard, and still have plenty of room unimpeded by the usual cable spaghetti if I want to add anything else, although I'm pretty maxed out of stuff I'd want to put in. Since this fits (barely) under my table I keep the top grille open so the cat's not a problem... I actually like the back-routed USB3 setup. The onboard header is used for the add-on unit, which gives me 4 front USB3 ports. I did notice from the beginning that the fan control system didn't seem to do much about noise levels, but I'm not that bothered by fan noise anyway. The stock fans included with the case provide enough cooling and airflow, with the cables all tucked away behind the motherboard, to keep all my temps generally in the low 30's at idle and about 15 degrees higher when I'm running games (Crysis, Rage, FC3, Borderlands 1 & 2,etc). The CoolerMaster Hyper 212 cpu cooler fits with room to spare. Asrock 990FX Extreme 4 with Vishera 6-core, 16GB GSkill 1866, and dual AMD 5775 cards (those are somewhat dated, but enough in CrossFire for me on my budget). I would buy this case again for any other full-tower system I'd want to build.jlpurvis - Monday, March 11, 2013 - link
I just received y Thor V2 in the mail last week, and it is a very solid, good case. Just a heads up, they did replace the USB 3.0 connector with an internal motherboard header, so I don't have to hook it up in the back, but directly onto the motherboard. Also, the rubber grommets feel very secure, and the fan knobs don't feel clunky, or loose. I believe they fixed your biggest complaints about the case.PA Systems1 - Sunday, June 23, 2013 - link
I've just purchased this case from Newegg. Bought it for its size and cooling capabilities. I do have one question that the article doesn't seem to answer. If the front USB cables do not connect to the USB 3.0 headers on the mobo how are they connected to the system and powered? Before reading this article mentioning that I thought I would absolutely need a mobo with USB 3.0 internal headers. To be honest I haven't looked inside it YET because the other parts to my new build are waiting on price drops from Newegg. It could be a slow process but this case and some other components came on Newegg as deals first.frostshoxx - Tuesday, September 15, 2015 - link
Where exactly is the reset button? I can only find the power button.