IN-WIN BUC: Just How Much $100 Can Buy
by Dustin Sklavos on May 9, 2011 4:28 PM EST- Posted in
- Cases/Cooling/PSUs
- In-Win
- mid-tower
Assembling the IN-WIN BUC
While the SilverStone FT03 we recently reviewed required some level of instruction to assemble, the BUC doesn't come with a manual. You can download one online, but the overall design of the case is smart enough that we doubt you'll need it.
Installing the motherboard was easy enough thanks to the built-in standoffs on the tray, and there are plenty of cable routing holes surrounding it to keep the internals relatively clean. It's worth mentioning there's a decent-sized cutout in the tray for cooler backplates; hopefully at some point Intel will realize their push-pin mounting system sucks hard (I've actually seen a machine where the pins deteriorated after just a couple of years and the stock heatsink fell off), but until then it's nice to see most case manufacturers have us covered.
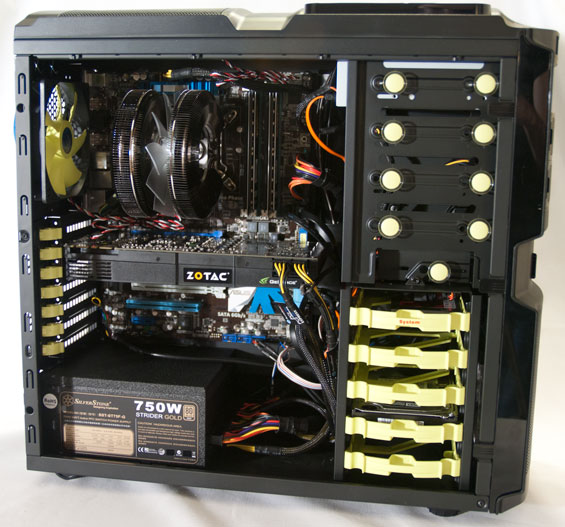
Removing the covers for the external bays is also painless as I mentioned before, though every bay below the top one has a metal piece you'll need to twist and remove. From there, pop out the fastening knobs, slide the optical drive in, then push the pins in and you're good. Again, this is a remarkably simple and sturdy system, and I never felt like the drive was anything less than completely secure. If that's not satisfactory, though, you can actually screw the drive in on the opposite side.
Unfortunately, the 3.5" drive trays aren't toolless and can be a source of some frustration. You have to squeeze the handle from the sides to loosen these trays up, but that's easier said than done and can require a remarkable amount of effort. That calls into question the usefulness of the hotswappable drive bay door, but the system does essentially work. To install a 3.5" drive, you need to first install rubber standoffs, then use special screws included with the case to mount the drive. This worked fine with a pair of Western Digital drives I tested, but an ever-so-slightly wider Seagate Barracuda just plain wouldn't fit using the side screws and had to be attached to the bottom of the tray. Once you're done it's good to go and lines up perfectly with the backplane, but the extra steps here and difficulty actually swapping drives can be a nuisance. 2.5" drives are bottom mounted in the trays with the mounting holes clearly labeled; these don't have any kind of vibration dampening, but you're expected to mount SSDs with no moving parts so it's a non-issue.


The backplane is probably one of my favorite features and a surprising inclusion in a case at this price. It basically consolidates power connections into just two plugs, and already has SATA cables built in that for the most part easily route to the ports on the motherboard. While it's necessary for any kind of hotswap functionality to even work, I was just happy it was there to make cable routing that much simpler.
Installing expansion cards with the built-in mounting system was surprisingly painless. The GTX 580 lined up and locked into place on the motherboard, and then the clamps came down and did their job. No muss, no fuss, although if you like you can also screw the card in.
Beyond hard drive and SSD installation, there were really two points that did require a bit of fuss during assembly. The first is the power supply, which essentially "snaps" into place but still didn't feel quite as clean as the other parts of the case did. I had to apply some measure of force to get it in, and from there it felt...mostly secure. In that instance I did wind up using screws to secure it in the back of the enclosure, and for those that are concerned, there's ventilation (and a removable filter) beneath the power supply. My other snag came with installing a 120mm fan in the side panel. There are vibration-dampening rubber grommets included, but these pop out relatively easily and so installation effectively requires lining up three elements instead of two: the fan, the grommets, and the screw holes. I was able to do it, but case fans almost never feel like they mount right and this was no exception.

After all was said and done, my only major complaint was, surprisingly, cable routing. I had issues with this with the Antec P182 and again with the Corsair 600T, and I was hoping I wouldn't run into it here after our IN-WIN rep showed us some other models (we do have one more IN-WIN case on hand we'll be reviewing in the future) that had ample space behind the motherboard tray expressly for cabling. Getting the right-hand side panel back on proved to be an exercise in frustration and brute force, as it often tends to be with other enclosures, and my feeling is this: if you don't have enough space behind your motherboard tray for a molex connector to stand on its side, you don't have enough space. Mercifully the BUC's side panels are fairly flexible and can bow enough to handle it (unlike, say, the P182/183), but this is an issue that we shouldn't even be having at this point. I'm willing to accept a case that's a half inch wider if it means I don't have to grunt every time I put the side panel back on.


57 Comments
View All Comments
cjs150 - Tuesday, May 10, 2011 - link
Please include case dimensions in metric as well as inches. Motherboards, fans, radiators are all in metric measurements and it makes it a lot easier for those, like me, who stuff cases with lots of kit to work out will fit.I am also as frustrated as reviewer with cable routing. It really is not that difficult to allow a bit more space behind the motherboard tray. It is worse for me because I like silence from my pc and therefore want to put noise reducing stuff on the side panels.
Finally, I am not particularly bothered by the number of HD the case can hold (I am building a 6TB file server which will be enough for decades of films), all I need is space for 2 drives, an SSD + one HD. However, I do like to have an optical drive in the system. I have yet to see any case deal with providing real noise reduction/anti-vibration for an optical drive.
bhima - Tuesday, May 10, 2011 - link
The Antec 900 has become sort of the mainstream case standard. I think getting the data for that case will make it easier to judge what these numbers mean in the real world when testing other cases against it. That way, people can pick a case based on whether it cools better than the 900, or is quieter than the 900.Of course, once you have a bunch of cases reviewed, you won't need a reference case anymore, but while you build up a review archive it would be nice to get the info for such a popular case.
e_sandrs - Tuesday, May 10, 2011 - link
We've been using INWIN cases for a long time to build a few hundred computers per year and I have only good things to say about them! Very nice build quality for the price - I'm glad they're getting some love here on AT!xrror - Tuesday, May 10, 2011 - link
I kinda miss the stop motion video of you fighting with a screwdriver and actually installing a build into a case in this review. I wholeheartedly recommend buying a cheap electric screwdriver and having every case review feature you doing assemblies with the time lapse footage.I mean, reading about how all the pieces and such fit together is good - but seeing one wrangle with the cables and such really brings out a more practical view of a case. For instance in this review one thing that might stand out is the decided lack of need for a screwdriver. Also it would help show off the "backplane wiring" as you hooked up all the power connectors and then slide (I guess somehow?) the motherboard into the case.
jerem43 - Tuesday, May 10, 2011 - link
I've been using in-win cases for years. A strong sturdy case with ease of access, no sharp edges, quality power supplies and good heavy gauge steel make for an excellent case. Even their ,ore consumer oriented cases are a joy to work with, simple to access and maintain.kenyee - Friday, May 13, 2011 - link
That'd be a more useful noise test...use a standard drive and test how well you can hear the drive working...Michael Meio - Sunday, June 26, 2011 - link
It would be nice if as regular rule of computer case testing / reviewing, some part was dedicated to dust filters and the way they compare to other brands and models.IMO there are two kind of filters that cover the majority of options out there: Sponge and plastic.
I find that the presence of sponge or foam dust filters in a computer case shows some sort of lack of respect and a desperate corner cut attitude on the case manufacturer's part. A foam filter is in all aspects, the cheapest way to deal with it. It needs no special gap, no channel or punch holes to seat on, and obviously, minimum head scratching for the case's designer.
A plastic / nylon dust filter is different. It requires thinking. It needs a specific place to be. Just as the front cover or the side panels.. it relies on a designed mechanical solution to be attached to the case and held in place. It simply shows the attention to detail on the manufacturer's part.
The dust filters location, functionality, ease of use / remove / "washability" truly plays a big deal on my buying decision when it comes to chassis.
I don't own a BUC case and currently, I'm shopping around. It surprises me how difficult it is to find out what are computer case filters made of in pretty much every single review out there. Needless to mention, their location, ease of use, etc. This review unfortunately, is not an exception to that.