AnandTech Guide to Better Photos: Portraits
by Stephen Caston on January 19, 2005 12:05 AM EST- Posted in
- Digital Camera
Outdoor Portraits
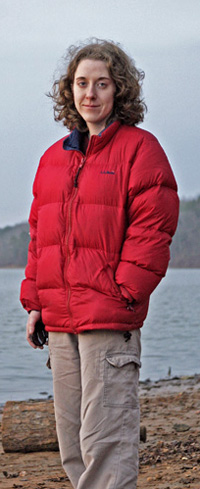
In the daylight outside, there is usually more than enough light for versatile portrait photography. One of the greatest opportunities for portraits is an overcast day. The diffusion of daylight through the clouds creates a very pleasant soft light that looks great for portraits. If there are no clouds to shoot under, look for the shade of a tree instead. The effect is similar with the sunlight filtering through the leaves. Without shade from the sun, there will likely be strong shadows and bright highlights on your subject that will be difficult to expose properly. Strong shadows tend to exaggerate noses, wrinkles, etc. - all of which your subject will not appreciate.When arranging your shot, pay close attention to the direction of light. Have your subject face in different directions while you monitor the effect. Even with diffused overcast lighting, if the light is shining down from a position above your subject, there will be some soft shadows that may not be the most flattering for your subject. To remedy this, there are two popular options: reflectors and fill flash. A reflector is simply a white or colored surface that is used to bounce light upward into the subject's face to fill in shadows. The difference in the color of the reflector simply affects the color cast on the subject. For example, if you wanted to reflect a warmer light, you could use an orange reflector. Below is an example of how a reflector can be used.

Subject at right holding reflector
In the image above, our subject held the reflector herself. If we were taking full body portraits, we would obviously need another method of holding the reflector. In the absence of assistance, a tripod and self-timer will allow you to hold the reflector for your subject. In the example below, we used a large white piece of cardboard to reflect light into shadow areas on the subject's face. You can pick up one of these inexpensive reflectors at any office supply store. However, high quality collapsible reflectors can be purchased from professional camera stores as well. Hold your mouse over the image below to see the difference.

Hold mouse over image.
In the above image with the reflector, notice how the major shadows under the neck, cheeks, and eyes have been filled in with soft white light. Think of a reflector as a moveable soft light source. You can change positions and angles to produce difference effects. Another option is to use the camera's flash to produce a similar effect. This is referred to as a fill flash. Fill flash essentially forces the camera to use its flash even though there is already enough light for a shot. To use a fill flash in your portrait shot, set your camera to its fill/force flash setting and take your picture as normal. You may need to move closer to your subject depending on the range of your flash. Some cameras have the option to adjust the intensity of the fill flash. Below is an example of a fill flash. Hold your mouse over the image to see the difference.

Hold mouse over image.
In addition to filling in shadow areas, a fill flash also adds a "catch light" in the subject's eyes. This helps direct the viewer's attention and gives the eyes a special emphasis. In the latest version of Adobe Photoshop, you can even fill in some of these shadows later on during post processing. In Photoshop CS, there is an option under the Adjustments menu called "Shadow/Highlight". In the comparison below, the original image was taken without the use of a reflector or fill flash. In the rollover image, we specified 40% under the Shadow section of the popup dialog box. Hold your mouse over the original image to see the effect of the Shadow/Highlight feature in Photoshop CS.
Hold mouse over image.
Look for interesting lighting when you are shooting outside. For example, when the sun is behind your subject, a "halo" effect can be achieved from the backlighting. In the example below, we took a picture of our subject with the sun behind her.

The effect is a warm highlight along the edges of the hair. In the picture above, we used a whiteboard to reflect light back to the subject's face to fill in some shadows. One of the problems that you will run into when shooting into the sun is that the camera will most likely underexpose the image. To avoid this, you should try setting your camera to spot metering. When set to spot metering, the camera will meter the light from a small point instead of the whole frame. Another option when working with backlighting is to apply an E.C. (exposure compensation). E.C. can be applied to force the camera to expose the image more or less than it normally would. When a camera is pointed at a bright scene, it will typically underexpose the subject. If this is the case, try applying a positive E.C. Check the results and adjust the E.C. until the picture looks well-exposed.
 |
 |

With these basic portrait ideas, you should have no problem producing great looking portraits with little effort. Remember to experiment with different shooting angles and subject positions. Pay attention to the quality of light. If it is too harsh or strong shadows appear, use a fill flash or reflector. For outdoor shooting, there is no excuse for not getting a reflector. They are inexpensive and will enhance your overall portrait quality. The more pictures you take, the more you will learn what works and what doesn't. In our next guide, we are going to explore the possibilities of night pictures. In the meantime, start taking more pictures of your friends and family. Pay attention to your technique and analyze the results. Before you know it, people will be begging you to take their picture!


30 Comments
View All Comments
thehorriblejoke - Friday, October 15, 2010 - link
my name is horribleshuttleboi - Thursday, January 20, 2005 - link
#17: try using a camera more advanced that a point-and-shoot and you will see. Yes, focal length *does* affect DoF. A longer focal length reduces DoF if the aperture and camera-to-subject distance do not change.http://www.dpreview.com/learn/?/Glossary/Optical/D...
skunklet - Thursday, January 20, 2005 - link
DOF is based only on f/stop and how close you are focusing. focal length does not effect it.apriest - Thursday, January 20, 2005 - link
#12, 105-135mm is my favorite range for portraits, unless they are candid shots from a long distance.Live - Thursday, January 20, 2005 - link
I especially liked the tip about post processing your shots in Photoshop. Since I’m an amateur I don’t really know how my pictures will turn out. So more tips on how “bad” photos can be made better would be most welcome. What’s the best way to get rid of redeye for example? I mean of course you should by an SLR and use a good flash. But if that’s not an option with your compact camera what can be done about it afterwards?CB1 - Thursday, January 20, 2005 - link
#10 is indeed wrong about depth of field. Correct answer given in #12.headbox - Thursday, January 20, 2005 - link
thanks for the great guide- too bad my daughter won't sit still....shuttleboi - Thursday, January 20, 2005 - link
#10, you are wrong, depth of field is controlled by three variables: (1) aperture; (2) focal length; and (3) distance between the camera and subject. Fixing any two of those and varying the third will change the DoF. Note that changing 2 and 3 also change the perspective.Speaking of perspective, one thing the author did not mention is that the ideal focal length for portraits is 85mm. Anything shorter results in bulbous faces (e.g. bigger noses and cheeks). FYI The absolute greatest portrait lens has to be the Canon 135mm f2 L (long focal length, wide max aperture, great glass).
CB1 - Wednesday, January 19, 2005 - link
The other, and I think more important reason to use your longest focal length on a zoom, or use a short telephoto, is perspective for facial features. If you take a headshot with a "normal" focal length lens, 45 to 50mm for a 35mm camera, noses become unnaturally big (front) or cheeks appear fat (side). A short telephoto puts the viewer at a distance we're used to in real life, a distance where the perpective is natural.ElFenix - Wednesday, January 19, 2005 - link
i think this is the best article series on anandtech in a while. everyone has cameras these days with tons of functions, and no one knows how to use them.one minor thing though, depth-of-field is solely dependent upon the absolute size of the aperature. so a 200mm lens at f/3 has a smaller depth of field than a 100mm lens at f/2.
woodaddy - use the self timer :)