Half Life 2 GPU Roundup Part 2 - Mainstream DX8/DX9 Battle
by Anand Lal Shimpi on November 19, 2004 6:35 PM EST- Posted in
- GPUs
If you haven't read Part 1 of our Half Life 2 GPU Roundup, click here to read it before continuing on with this article.
The golden rule of Half Life 2 is this – regardless of what sort of graphics card you have (within reason), the game will run well, but at varying levels of image quality. Here’s an example: in our at_canals_08 benchmark at 1280 x 1024, the ATI Radeon 9700 Pro averages 54.2 frames per second. A GeForce4 MX440, averages 45.6 frames per second - pretty close considering the 9700 Pro was one of ATI's most powerful GPUs and sold for $400, and the GeForce4 MX is basically a GeForce2 MX. Now both of these cards were run at their maximum detail settings, but here’s where the two cards differ: the best image quality settings the GeForce4 MX can achieve are significantly lower than what the Radeon 9700 Pro can achieve. It is this type of situation that lays the foundation for our comparison here today.
When it comes to developing games, the biggest thing publishers look for are minimum system requirements. The lower the minimum system requirements, the more games publishers can sell. But the problem with really low minimum system requirements is that you end up with a game that doesn’t look too great on higher end hardware. Valve has spent a great deal of time ensuring that multiple rendering paths were included with Half Life 2 to not only offer great performance on low end graphics cards, but also to offer spectacular image quality on high end GPUs. The three codepaths that we will be looking at today are Valve’s DirectX 7, DirectX 8/8.1 and DirectX 9 paths in Half Life 2.
All of the GPUs we compared in Part 1 of our Half Life 2 performance guides not only default to the DirectX 9 codepath, but also perform very well under it. We will show a comparison between the DX9 and DX8 codepaths shortly but rest assured that if you can run Half Life 2 in DX9 mode then you definitely should as it offers the best image quality you can get.
Half Life 2 performs a system-wide autodetect that will automatically select the best rendering path and image quality settings for your hardware. You can find out which rendering path you are using by looking at the video options control panel within Half Life 2:
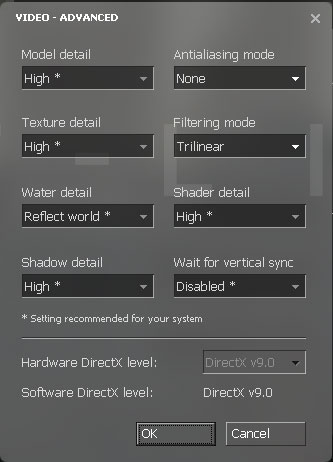
The Hardware DirectX level field indicates what rendering path you are currently using. You can specify alternate rendering paths by using the following commandline switch: -dxlevel xx, where xx is 90 for DirectX 9, 81 for DirectX 8.1, 80 for DirectX 8.0 and 70 for DirectX 7.0. You can specify whatever DX level you'd like, but if your hardware doesn't support it you won't get any of the benefits of it. For our tests here today we used the DX9, DX8 and DX7 rendering paths. When possible we used the DX8.1 rendering path.
The point of this article is to compare both the image quality and the performance of the more mainstream DirectX 8 and DirectX 9 GPUs, and what better way to start than by looking at the difference in image quality between the DX8 and DX9 codepaths...


62 Comments
View All Comments
vladik007 - Friday, November 19, 2004 - link
cant wait for CPU benches. Again , great article , something i've come to expect here.Btw , when might u be releasing CPU benches ? I'm about to order my cpu/mobo upgrade this weekend so i can play with it over the Tgiving holiday , i'm thinking A643200+Abit 939 board. ( i've always ,since my 1st computer, owned Abit motherboard , so i'm not going to change ritual , too bad they dont make one with nforce3)
SMT - Friday, November 19, 2004 - link
Um, I'll say it again...I'm pretty sure Gordon has a flashlight throughout Nova Prospekt.